
Have you ever stood on a scale and wondered if the number is truly accurate? Or tried measuring chemicals in a lab only to second-guess your technique? Reading a balance scale correctly is about understanding how the device works, preparing it properly, and interpreting the result with precision. Whether you’re using a triple beam in a classroom, a doctor’s balance beam scale, or a digital lab balance, how to read a balance scale hinges on consistent steps, correct setup, and attention to detail.
Balance scales measure mass by comparing known and unknown weights or through electronic sensors. They come in mechanical and digital forms, each with unique reading methods. This guide walks you through every step: from identifying your scale type and zeroing it out, to reading beams, digital displays, and avoiding common mistakes. You’ll learn how to get reliable results every time.
Identify Your Scale Type
Before you can read a balance scale, you must know what kind you’re using. Each type has a distinct method for measurement and interpretation.
Choose the Right Tool for the Task
Different scales serve different purposes. Using the wrong one leads to inaccurate readings or equipment damage.
• Triple beam balances are common in schools and basic labs, ideal for measuring objects up to 600 to 1000 grams with 0.1 gram precision.
• Double pan (equal arm) balances rely on physical weights and are used for comparative mass analysis.
• Balance beam (doctor’s) scales measure body weight using sliding weights on a horizontal bar.
• Digital (electronic) balances offer instant readouts and advanced features like tare and unit conversion.
• Dial scales use a spring mechanism and pointer, less precise but durable for home or industrial use.
Knowing your scale ensures you apply the correct reading technique and respect its limitations.
Prepare the Scale for Use
Accuracy starts before you place anything on the pan. A poorly prepared scale introduces error from the first step.
Level and Stabilize the Surface
An uneven surface tilts the balance, disrupting equilibrium.
• Place the scale on a hard, flat surface. Never place it on carpet or a wobbly table.
• Use the built-in bubble level to adjust the feet until the bubble centers.
• Avoid areas with vibrations like near doors or machinery, or air currents near vents or open windows.
For analytical and precision balances, even minor disturbances affect readings.
Clean and Inspect Components
Dirt, dust, or residue on pans or beams causes imbalance.
• Wipe the pan with a soft, dry cloth.
• Check for dents, corrosion, or stuck sliders.
• Replace damaged parts before proceeding.
A clean scale ensures the measured mass reflects only the object, not contamination.
Zero the Balance Correctly
Zeroing eliminates baseline error. Skipping this step means all readings will be offset.
For Mechanical Balances: Reset Riders and Adjust Counterweight
- Remove all objects from the pan.
- Slide all riders on triple beam or weights on beam scales to the leftmost zero position.
- Observe the pointer. If it aligns with the zero mark, the scale is ready. If not, turn the adjustment knob or counterweight until alignment is achieved.
Pro Tip: On older models, this may require small turns. Be patient. Over-adjusting worsens the imbalance.
For Digital Balances: Use the Tare or Zero Button
- Power on the scale.
- Wait for the startup sequence to finish, usually 2 to 5 seconds.
- If the display does not show 0.0, press “Tare” or “Zero.”
- Some models auto-zero, while others require manual input.
Warning: Never skip zeroing. Even if the scale was used recently, movement or temperature changes can shift calibration.
Calibrate for Long-Term Accuracy
Calibration ensures your scale reads true against a known standard. It’s essential for scientific and commercial use.
Use Certified Calibration Weights
• Select a weight close to the scale’s typical use range, like 100 grams for a lab balance.
• Place it gently on the center of the pan.
• Compare the reading to the weight’s certified value.
If they do not match, perform calibration if your model supports it.
Follow Manufacturer’s Calibration Procedure
- Press “CAL” on digital models.
- Wait for the prompt to appear.
- Place the calibration weight on the pan.
- Wait for completion. The display returns to 0.0 or shows a success icon.
Note: Legal-for-trade scales used in selling goods require certified calibration and may be sealed to prevent tampering.
Read a Triple Beam Balance

The triple beam balance teaches core principles of mass and equilibrium. It’s widely used in education and basic laboratories.
Understand the Three Beams
Each beam holds a rider that measures a specific range.
• 100 g beam moves in 100 g increments, from 0 to 1000 g.
• 10 g beam moves in 10 g steps.
• 1 g beam fine-tunes with 0.1 g divisions, reading to the nearest tenth.
Together, they allow precise measurement without electricity.
Step-by-Step Reading Process
- Zero the scale as described earlier.
- Place the object gently in the center of the pan.
- Move the 100 g rider right one notch at a time. Stop when the pointer drops below zero. Return to the last position where balance was maintained.
- Repeat with the 10 g rider. Move in 10 g steps, backing up when imbalance occurs.
- Fine-tune with the 1 g rider. Slide slowly across the front beam. Stop when the pointer returns to zero.
- Add the values from all three beams.
Example:
• 100 g beam: 200 g
• 10 g beam: 30 g
• 1 g beam: 4.7 g
Total: 234.7 gExpert Note: Always read the 1 g beam at eye level to avoid parallax error.
Use a Double Pan Balance
This classic design compares an unknown mass to known standard weights.
Balance Object Against Known Masses
- Zero the empty pans by adjusting the counterweight.
- Place the object on the left pan.
- Add standard weights to the right pan, starting with the largest like 100 g, then 50 g, then 10 g.
- Use smaller weights like 1 g and 0.1 g until the beam levels.
- Sum all weights on the right. This equals the object’s mass.
Critical Rule: Always use forceps or tweezers to handle weights. Finger oils cause corrosion and mass drift.
Achieve True Equilibrium
• The beam must be perfectly horizontal.
• The pointer should align with the center mark.
• Wait for full stabilization. Do not rush.
Pro Tip: Store weights in their case when not in use to prevent loss or contamination.
Read a Doctor’s Balance Beam Scale
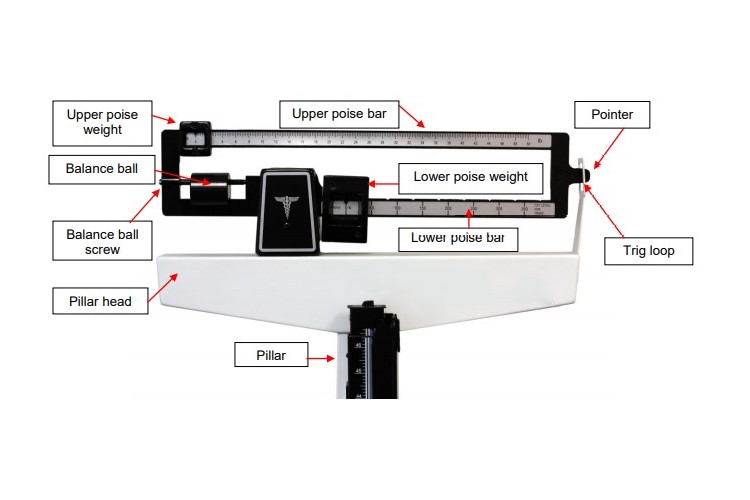
Common in clinics, this scale measures body weight using sliding weights.
Position the User Correctly
• Have the person stand still with feet centered on the platform.
• Arms should be at sides, not touching walls or furniture.
• Wear minimal, consistent clothing for tracking accuracy.
Adjust the Sliding Weights
- Move the large weight in 50 kg or 100 lb increments along the beam. Slide until the indicator drops below center. Step back to the last balanced position.
- Use the small weight, 1 to 10 lb or 0.5 to 5 kg, for fine adjustment. Move slowly until the beam is level.
- Sum both values for total weight.
Example:
• Large slider: 150 lb
• Small slider: 7 lb
Total: 157 lbWarning: Never let someone jump on the scale. It damages internal mechanisms.
Return to Zero After Use
Slide both weights fully left. This prevents wear and ensures readiness for the next user.
Operate a Digital Balance Accurately
Digital scales offer speed and precision but require careful handling.
Wait for Stabilization
- Place the object gently in the center of the platform.
- Wait until the display stops flashing or shows a stable icon.
- Record the value exactly as shown.
Note: Some models update every 0.2 seconds. Rushing leads to inaccurate readings.
Use the Tare Function Properly
Need to weigh contents without the container?
- Place the empty container on the scale.
- Press “Tare.” The display resets to 0.0.
- Add material. The new reading is the net weight.
Advanced Tip: Some digital scales allow memory tare, so you can reuse the same container without resetting.
Check Units and Decimal Places
• Confirm the unit is correct, such as g, kg, oz, or lb.
• Respect the scale’s readability. Do not report more digits than shown.
• Example: If d = 0.01 g, recording 0.0123 g is invalid.
Avoid Common Reading Errors
Even experienced users make mistakes. These errors affect accuracy and repeatability.
Do Not Ignore Parallax
Viewing the pointer or beam from an angle creates false readings.
• Always look straight on at the indicator.
• Use a mirror-backed scale if available to eliminate parallax.
Never Skip Warm-Up Time
Electronic balances need 10 to 30 minutes to stabilize after power-on.
• Cold components drift during early use.
• High-precision labs require full warm-up before critical measurements.
Avoid Environmental Interference
• Air currents push on light objects. Use draft shields on analytical balances.
• Temperature changes affect metal components. Avoid direct sunlight or heaters.
• Static electricity can lift powders. Ground the scale or use anti-static tools.
Record and Verify Your Results
Accurate measurement is not complete until you document and check it.
Repeat Measurements for Consistency
Weigh the same object 2 to 3 times.
• Results should match within the scale’s readability.
• If not, re-zero and inspect for issues.
Example: Three readings of 50.1 g, 50.2 g, and 50.1 g are acceptable for d = 0.1 g.
Cross-Check with a Second Scale
Compare results using a different, calibrated scale.
• This helps catch instrument failure.
• It is essential for quality control in labs and industry.
Document Key Details
Record the following for traceability.
• Weight and units, such as 234.7 g
• Date and time
• Scale model and serial number
• Calibration status
• Environmental notes like drafts or temperature
This ensures traceability, especially important in research and commerce.
Maintain Your Scale for Longevity
Proper care extends accuracy and lifespan.
Clean After Each Use
• Wipe pans with a soft, dry cloth.
• For spills, use mild soap and water. Never use solvents.
• Dry thoroughly before storage.
Store in a Controlled Environment
• Keep in a dry, dust-free area.
• Cover when not in use.
• Avoid extreme temperatures.
Replace Batteries Promptly
Weak batteries cause erratic readings or failure to zero.
• Remove batteries during long storage to prevent leakage.
• Use manufacturer-recommended types.
Frequently Asked Questions About Reading a Balance Scale
What is the difference between readability (d) and verification scale interval (e)?
Readability (d) is the smallest increment displayed on the scale. Verification scale interval (e) is the smallest increment considered valid for legal metrology. Sometimes e equals d, but often e is 10 times d. The last digit may appear in brackets on the display, meaning it is visible but not legally valid for trade.
How do I know if my scale needs calibration?
Your scale needs calibration if readings seem off compared to known weights, after moving the device, before critical measurements, or periodically per manufacturer guidelines. Use certified calibration weights to check accuracy. If readings deviate from expected values, calibration is necessary.
Why does my digital scale show different readings each time I weigh the same object?
This happens due to environmental factors like air currents, temperature changes, or vibrations. It can also occur from improper placement, not waiting for stabilization, or a need for recalibration. Ensure the scale is on a stable surface, wait for the display to stabilize, and verify calibration.
Can I use my kitchen scale for laboratory measurements?
Kitchen scales generally lack the precision required for laboratory work. They typically measure in 1 g increments, while labs often need 0.1 g or finer precision. For accurate laboratory measurements, use an analytical or precision balance with appropriate readability for your application.
What causes parallax error when reading a balance scale?
Parallax error occurs when you view the pointer or scale markings from an angle rather than straight on. This makes the reading appear different than the actual position. Always look perpendicular to the pointer, and consider using mirror-backed scales to eliminate this error.
How often should I calibrate my balance scale?
Calibration frequency depends on usage, environment, and manufacturer recommendations. For frequent use or high-precision work, calibrate before each critical measurement. For occasional use, calibrate monthly or after any movement or impact. Always follow your specific manufacturer’s guidelines.
Key Takeaways for Mastering Balance Scale Reading
Reading a balance scale accurately combines proper setup, correct technique, and attention to detail. Whether mechanical or digital, the process starts with zeroing, continues with careful measurement, and ends with verification. Always identify your scale type first, then prepare the surface, zero the balance, and follow the specific reading procedure for your model. Understanding readability and verification intervals ensures you report results correctly. Avoid common mistakes like parallax, skipping warm-up time, and ignoring environmental factors. By understanding your scale type, respecting its readability, and avoiding common errors, you ensure reliable, repeatable results essential in science, health, and daily life. Practice these steps consistently, and you will master how to read a balance scale with confidence.



