
If your weighing scale is giving inconsistent readings, showing visible buildup, or collecting dust, it needs attention. Learning how to clean weighing scale properly helps protect sensitive components like the load cell and circuit board from damage, preventing inaccurate measurements or permanent failure. The right approach preserves accuracy, extends the lifespan of your equipment, and helps avoid costly repairs. This guide walks you through every step, from safety preparation to final calibration, based on expert practices and manufacturer guidelines.
Power Off and Unplug First
Before touching any part of your scale, disconnect all power sources. This is non-negotiable for safety and equipment protection.
Why Power Down Matters
Leaving the scale plugged in or powered on during cleaning increases the risk of electric shock, short circuits, and accidental activation. Even moisture from a damp cloth can seep into internal electronics and fry the circuit board.
Steps to Safely Power Down
Turn off the display using the power button. Unplug the AC adapter from the outlet. If the scale uses batteries, remove them. Wait one to two minutes before proceeding to ensure no residual current flows through the system.
Wear Protective Gear
Cleaning involves more than just the scale. Your safety matters, especially in laboratory or industrial settings.
Recommended Protective Equipment
Wear disposable gloves to prevent oil transfer and protect against chemical residues. Use safety goggles to shield your eyes from splashes when using disinfectants. Put on a lab coat or apron to avoid contaminating your clothing with cleaning agents.
Even for home use, gloves help keep fingerprints off sensitive surfaces and improve your grip when handling glass components.
Remove and Clean Detachable Parts
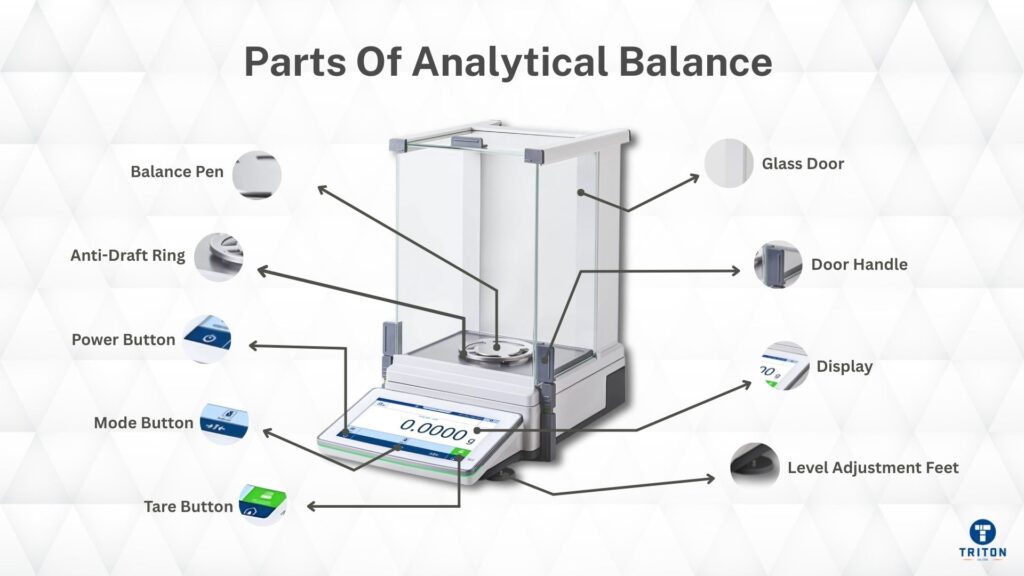
Most scales have removable components that should be cleaned separately to avoid exposing internal electronics to liquids.
Parts to Remove
Carefully remove the weighing pan, draft shield, drip tray, and any accessible cover or housing. Place these parts on a clean, soft surface to prevent scratches during cleaning.
Clean Stainless Steel Components
Many pans and trays are made of stainless steel and can be washed thoroughly. Wash with mild detergent and warm water using a soft sponge or lint-free cloth. Rinse and dry completely with a microfiber towel. Some stainless steel parts may be dishwasher-safe or autoclavable, but only if your manual explicitly permits this.
For stubborn residue, soak the parts in soapy water for ten to fifteen minutes before wiping clean.
Wipe Glass Draft Shields
Draft shields prevent air currents but easily collect fingerprints and dust. Wipe both sides with a lint-free cloth dampened slightly with seventy percent ethanol or isopropyl alcohol. Avoid ammonia-based cleaners since they can damage anti-static coatings. Dry immediately to prevent streaks or moisture buildup near seals.
Clean External Surfaces Safely
The housing, screen, and control panel are frequently touched and need regular cleaning to maintain hygiene and functionality.
Tools and Step-by-Step Process
You will need a lint-free cloth, cotton swabs, and a mild cleaner such as water, diluted soap, or seventy percent ethanol. Slightly dampen the cloth but never soak it. Gently wipe the display screen, control buttons, and side and base housing. Use cotton swabs for crevices around buttons and in tight spaces.
Never use paper towels since they can scratch surfaces or leave lint behind.
Never Spray Liquids Directly
One of the most common mistakes is spraying cleaner directly onto the scale housing.
Why This Is Dangerous
Liquid can drip into vents and damage the circuitry. Moisture causes corrosion and short circuits. Internal sensors may fail due to condensation buildup.
Safe Alternative
Always spray the cleaning solution onto the cloth first, never directly onto the scale. Then wipe the surface gently with the dampened cloth.
Clean Internal Areas with Extreme Care
Only clean inside the scale if it is powered off and unplugged. Never open sealed compartments that may void your warranty.
When Internal Cleaning Is Needed
Consider internal cleaning when dust buildup is visible under the pan, when readings are inconsistent with no obvious cause, or during monthly maintenance in dusty environments.
Approved Tools and Methods
Use a soft brush such as an artist’s brush or clean makeup brush. Use compressed air in short bursts to blow dust from crevices. Use dry cotton swabs and lint-free cloths for accessible areas. Never use liquid cleaners or a wet cloth inside the scale.
Gently remove the weighing pan and use compressed air to blow debris from under the pan support and around vents. Brush dust away from the sensor area but never touch the load cell directly.
Avoid These Cleaning Agents
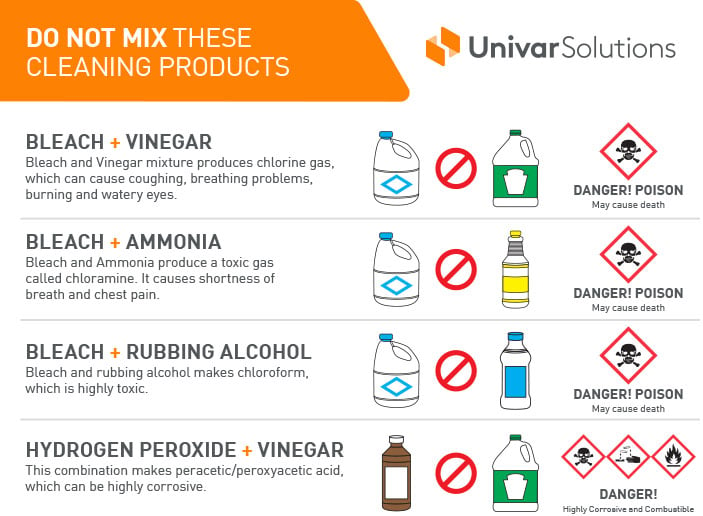
Using the wrong chemical can permanently damage your scale.
Cleaners to Never Use
Avoid bleach or chlorine-based solutions, acetone or nail polish remover, ammonia-based glass cleaners, abrasive powders, and scouring pads or steel wool.
Approved Cleaning Solutions
Use water for general wipe-downs. Use mild dish soap for grease or organic residue. Use seventy percent ethanol for lab disinfection. Use isopropyl alcohol for fingerprints and oils. Use commercial lab detergents for cGMP environments.
Always test a small area first if you are unsure about a particular cleaner.
Dry Completely Before Reassembly
Moisture is the enemy of electronics. Even tiny droplets can cause failure.
Drying Best Practices
Air-dry all removable parts for at least fifteen to thirty minutes. Wipe with a dry microfiber cloth. Let the scale sit unplugged for ten or more minutes after internal cleaning.
Never rush this step since condensation inside can lead to short circuits days later.
Recalibrate After Cleaning
Even gentle cleaning can shift calibration, especially if the sensor was disturbed.
Why Recalibration Is Essential
Recalibration ensures measurement accuracy. It compensates for minor mechanical shifts. It is required in regulated environments such as GMP and ISO facilities.
Calibration Steps
Place the scale on a level, vibration-free surface. Adjust leveling feet if needed. Initiate calibration mode following your manual instructions. Apply a certified test weight. Confirm successful calibration on the display.
If your scale gives strange readings after cleaning, the sensor may have been bumped. Contact a professional for recalibration.
Environment-Specific Cleaning Tips
Tailor your cleaning routine based on where the scale is used.
Laboratory and Pharmaceutical Settings
Clean after every use, especially when handling hazardous, reactive, or hygroscopic substances. Use seventy percent ethanol for disinfection. Document cleaning in a log as required for cGMP compliance.
Food Processing Environments
Use food-safe detergents. Sanitize regularly. Prevent water ingress by never rinsing the base.
Industrial Sites
Use compressed air monthly to remove dust. Protect the scale from metal shavings or powders. Seal openings if possible.
Humid or Wet Areas
Wipe down after each use. Store in a ventilated area to dry. Avoid condensation buildup.
Troubleshoot Post-Cleaning Issues
Even careful cleaning can lead to problems. Here is how to address them.
Scale Won Turn On
This usually means moisture is in the circuitry. Let the scale dry for several hours. Do not force power.
Inconsistent Readings
Debris in the load cell or an unlevel surface may be the cause. Re-clean gently, re-level the scale, and recalibrate.
Zero Drift or Fluctuation
Static charge or residual moisture could be the culprit. Allow warm-up time, clean the draft shield, and recalibrate.
Calibration Failure
Sensor misalignment may have occurred. Contact a certified technician and do not attempt DIY repair.
Display Errors
An internal short from liquid exposure is likely. Power off immediately and send the scale for professional service.
Maintain Long-Term Accuracy
Regular care keeps your scale accurate and reliable for years.
Daily and Weekly Habits
Wipe down the scale after each use. Cover it when not in use. Avoid placing it near sinks or ovens.
Monthly Tasks
Blow out dust with compressed air. Inspect for wear or damage. Check that the scale remains level.
Annual Actions
Schedule professional servicing. Replace worn parts such as feet, pan, or draft shield. Perform a full recalibration.
Frequently Asked Questions About Cleaning a Weighing Scale
Can I use water to clean the inside of my weighing scale?
Never use water or any liquid inside the scale. Liquids can cause short circuits and ruin the electronics. Only use dry methods such as compressed air, soft brushes, or dry lint-free cloths for internal cleaning.
How often should I clean my weighing scale?
Cleaning frequency depends on usage and environment. In laboratories, clean after every use. In industrial settings, clean daily, weekly, or monthly based on contamination risk. Clean immediately after any spills.
What is the load cell and why should I not touch it?
The load cell is the sensor that measures weight by detecting force. It is the most sensitive component in your scale. Touching or applying pressure to it can cause calibration drift or permanent damage, resulting in inaccurate readings.
Can I use alcohol to clean my scale?
Yes, seventy percent ethanol or isopropyl alcohol is approved for cleaning external surfaces. These solutions evaporate quickly and are safe for most surfaces. However, never spray them directly onto the scale. Apply to a cloth first.
Why does my scale give inaccurate readings after cleaning?
The sensor may have been disturbed during cleaning, or debris may have shifted. Re-level the scale and recalibrate using a certified test weight. If the problem persists, contact a professional technician.
What happens if I spray cleaner directly onto my scale?
Spraying liquids directly can cause them to drip into vents and damage the circuit board. This leads to short circuits, corrosion, and potentially permanent failure. Always apply cleaner to a cloth first.
Key Takeaways for Cleaning Your Weighing Scale
Always power off and unplug your scale before cleaning to prevent electric shock and circuit damage. Use only dry methods inside the scale and apply liquids to a cloth, never directly onto the device. Clean removable parts separately and ensure everything is completely dry before reassembly and recalibration. Following these practices protects your investment, maintains measurement accuracy, and extends the life of your weighing scale for years to come.



