
If your electronic scale isn’t accurate, you’re not alone. Millions of users face inconsistent readings, drifting displays, or complete measurement failures, especially in kitchen, bathroom, and lab settings. An electronic scale not accurate can ruin recipes, derail fitness progress, or compromise scientific data. The good news? Most accuracy issues stem from common, fixable causes like poor calibration, unstable surfaces, low batteries, or debris buildup.
This guide cuts through the noise to deliver a clear, step-by-step path to restoring your scale’s precision. You’ll learn how to diagnose the root cause, perform quick tests with everyday items, and apply targeted fixes. Whether it’s a $15 bathroom scale or a high-end kitchen model, you’ll walk away knowing exactly what’s wrong and how to fix it.
Calibrate Your Scale Correctly

Improper calibration is the number one reason an electronic scale isn’t accurate. Over time, internal sensors drift due to movement, temperature shifts, or regular use. Without recalibration, even small errors compound, leading to misleading readings that can ruin your day.
Why Calibration Fails
Scales that have been moved, dropped, or stored improperly lose their zero point. Budget models often lack auto-calibration, making them more prone to long-term drift. Some require manual calibration using specific button sequences and precise weights. Skipping this step leads to persistent inaccuracies.
Always calibrate after moving the scale, replacing batteries, long-term storage, or noticing inconsistent results.
How to Recalibrate Step by Step
- Place on a hard, level surface such as tile or hardwood.
- Turn on the scale and wait for it to stabilize, typically 30 seconds.
- Enter calibration mode by pressing and holding “Unit” or “Mode” until “CAL” appears. Some models require tapping “Tare” five times quickly.
- Add a certified calibration weight. Use a verified weight like 500g or 1kg. Do not use coins or household items unless verified.
- Wait for confirmation. The display may flash, then show “PASS” or return to zero.
- Test accuracy by weighing a known object to confirm precision.
Pro Tip: High-precision scales may require NIST-traceable weights for lab-grade accuracy.
Level the Surface and Scale
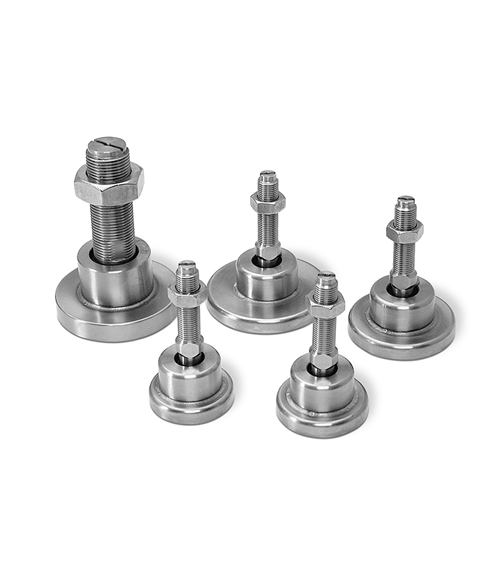
An uneven or soft surface is a silent accuracy killer. If your scale sits on carpet, a wobbly counter, or a tilted floor, gravity pulls unevenly on the load cells, causing false readings that can throw off your measurements significantly.
Hard Floor vs. Carpet: The 10% Error
Studies show bathroom scales on carpet can read 5 to 10% higher than on tile due to surface compression. The scale’s feet sink at different rates, distorting weight distribution in ways that seem minor but dramatically affect accuracy.
Fix this by moving to hard flooring like tile, concrete, or solid wood. Avoid rugs, mats, or foam pads. Use a level to check surface flatness before weighing.
Adjust Built-In Leveling Feet
Many digital scales, especially lab and industrial models, have adjustable feet and a bubble level for precise positioning.
Steps to level your scale:
- Place the scale on a firm surface.
- Check the bubble indicator to see current alignment.
- Rotate the feet until the bubble is centered.
- Retest weight consistency to confirm proper leveling.
For models without leveling feet, place a cutting board or acrylic sheet on a flat surface to create a stable base.
Test with Known Weights
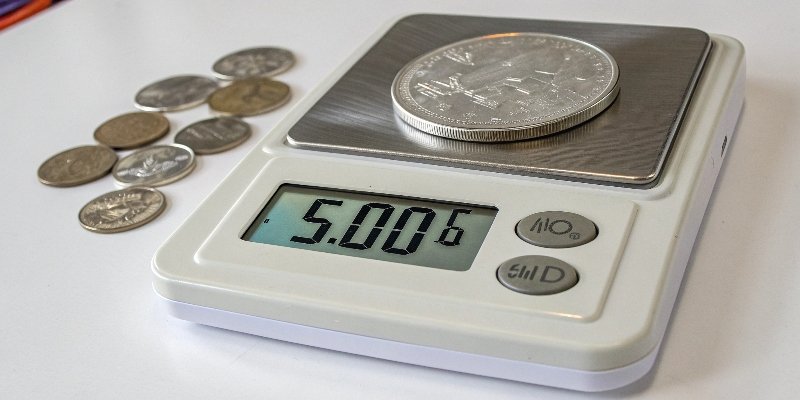
Before assuming hardware failure, verify inaccuracy using objects with exact masses. This simple step can save you from unnecessary repairs or replacements.
Use Coins or Dumbbells for Quick Checks
The U.S. Nickel Test provides a quick accuracy check. Each nickel weighs exactly 5.00g. Five nickels equal 25.00g. Place them gently on the center of the platform. The reading should be 25.0g with a tolerance of just 0.1g.
If it reads 24.5g or 25.8g, your scale needs calibration or cleaning.
For bathroom scales, perform the combined weight test:
- Weigh yourself and record the weight, such as 200 lb.
- Pick up a 10-lb weight.
- Step on again. It should read 210 lb.
If it shows 208 or 213 lb, investigate further with additional tests.
Check Linearity Across Range
Accuracy must hold at low, mid, and high loads for a scale to be truly reliable.
Test at multiple points:
- 100g should read 100g
- 500g should read 500g
- 900g (near max) should read 900g
Large deviations at higher weights suggest load cell damage or overload history that requires professional attention.
Replace or Check Batteries
Low battery power causes flickering displays, unstable readings, and failure to zero out. Even if the scale turns on, weak batteries distort the signal from the load cell to the processor, creating inaccurate results that seem random but have a clear cause.
Signs of Low Battery
Watch for these indicators:
- “LO” or “BAT” on display
- Numbers drift without load
- Scale won’t stabilize
- Resets when you step on
Fix It in 3 Steps
- Replace batteries with fresh alkaline or lithium. Avoid zinc-carbon batteries.
- Clean contacts with a dry cloth or cotton swab.
- Wait 30 seconds after insertion before use.
Pro Tip: Remove batteries during storage to prevent corrosion, especially in humid areas.
Clean Under and Around the Platform
Dirt, dust, hair, flour, or oil buildup can bind the scale’s moving parts. This prevents the load cell from responding freely, leading to stuck or inaccurate readings that persist no matter what you try.
Where Debris Hides
Common contamination sites include:
- Under bathroom scale feet
- Beneath kitchen scale pans
- Between platform and base
- Inside crevices around sensors
Cleaning Procedure
- Turn off and remove batteries.
- Lift the scale gently to access the underside.
- Remove the weighing pan if detachable.
- Wipe with a damp cloth and mild soap.
- Avoid soaking or spraying water directly.
- Dry completely before reassembling.
For stubborn gunk, use a soft toothbrush or compressed air to blow out debris. Clean monthly for best results.
Eliminate Environmental Interference
Even minor environmental factors can throw off sensitive electronics, creating mystery problems that frustrate users who don’t know what to look for.
Stop Air Currents and Drafts
Precision scales with 0.1g readability are affected by ceiling fans, HVAC vents, open windows, or even breathing near the scale.
Fix this by weighing in a closed room, using a draft shield (built-in or DIY), and turning off fans during use.
Avoid Temperature Swings
Scales work best between 68°F and 77°F (20°C to 25°C). Cold or hot environments alter load cell elasticity, causing readings to drift unexpectedly.
Do these things:
- Let the scale acclimate for 1 to 2 hours after moving from garage or car
- Keep away from ovens, radiators, or direct sunlight
- Store in climate-controlled space
Reduce Vibrations and EMI
Nearby microwaves, phones, or foot traffic create micro-vibrations or electromagnetic interference that disrupts accuracy.
Solutions include moving the scale away from appliances, using a rubber mat or anti-vibration pad, and turning off Wi-Fi or Bluetooth devices during critical weigh-ins.
Prevent Overloading and Shock Damage
Dropping a heavy pot or stepping on a small scale can permanently damage the load cell, turning a minor problem into an expensive one.
What Happens When You Overload
When you exceed the maximum capacity:
- Load cell deforms beyond recovery
- Solder joints crack
- Scale shows “OL” or “Err”
- Zero point shifts permanently
How to Avoid Damage
Follow these prevention rules:
- Never exceed max capacity (for example, 11 lb on a 10 lb scale)
- Place items gently without slamming
- Use padding in industrial settings
- Replace if readings are consistently off after zeroing
If your scale shows 0.5 lb when empty, the load cell is likely damaged and may need replacement.
Diagnose Aging or Component Failure
Even well-maintained scales wear out. Consumer models last 3 to 5 years while industrial ones can exceed 10 years with proper care.
Signs of Aging
Watch for these indicators:
- Takes longer to stabilize
- Needs frequent recalibration
- Fluctuating readings with no load
- Error codes appear randomly
If cleaning, leveling, and battery replacement don’t help, internal components may be failing.
When to Replace
Replace your scale if it fails calibration repeatedly, display is cracked or flickering, feet are bent or broken, there’s corrosion inside from moisture, or repair cost exceeds 50% of a new unit.
Upgrade to models with IP65+ rating for water and dust resistance, auto-calibration features, metal platforms, and overload protection.
Follow Preventive Maintenance Rules
Keep your scale accurate long-term with simple habits that take just minutes each month.
Monthly Maintenance Checklist
Clean under the platform, replace batteries if near expiry, test with known weight, and verify the surface is level.
Storage Tips
Store in a dry, room-temperature area, remove batteries, use a protective cover, and avoid stacking items on top.
Calibration Schedule
| Use Case | Frequency |
|---|---|
| Daily kitchen use | Weekly |
| Occasional baking | Monthly |
| After moving | Every time |
| High-precision (jewelry, lab) | Before each use |
Special Fixes by Scale Type
Kitchen Scales: Stop Recipe Ruiners
Baking demands plus or minus 1g accuracy. A faulty scale can ruin dough, candy, or coffee measurements.
Fixes for kitchen scales:
- Use 0.1g readability for precision work
- Clean after every use because oil and sugar gunk up sensors
- Keep away from stove because heat warps components
- Use metal over plastic platforms for durability
Test with 100ml water equaling 100g at room temperature.
Bathroom Scales: Get Consistent Readings
Weight varies by hydration, clothing, and time, but the scale itself shouldn’t vary.
Best practices:
- Weigh barefoot at the same time daily, such as morning
- Keep feet flat and centered on the platform
- Use tile or hardwood, never carpet
- Avoid smart scale syncing issues by resetting Bluetooth
If your weight jumps 3 lbs between steps, check the surface and battery.
Lab and Industrial Scales: Meet Standards
These must comply with ISO, GLP, or FDA requirements for professional accuracy.
Do these things:
- Keep calibration logs for compliance records
- Perform quarterly corner load tests
- Use NIST-traceable weights for certification
- Schedule annual professional servicing
The corner load test involves placing one-third max weight on each corner. All readings should match within tolerance. Large differences indicate misaligned load cells.
Tools You Need for Accuracy
Having the right tools makes troubleshooting much easier.
| Tool | Purpose |
|---|---|
| Calibration weights | Certified masses (NIST-traceable) |
| Bubble level | Ensure surface and scale are flat |
| Soft brush | Remove debris under platform |
| User manual | Find calibration codes and error meanings |
| Multimeter (advanced) | Test load cell output (1 to 3 mV/V) |
Never use unverified household items for calibration unless you’ve tested them first.
Final Troubleshooting Flowchart
Still getting bad readings? Follow this sequence:
- Replace batteries first
- Move to hard, level surface
- Clean thoroughly
- Reset by removing batteries for 2 minutes
- Recalibrate using proper procedure
- Test with known weight
- If still inaccurate, replace the scale
If the scale fails step 6, it’s likely beyond repair and a new unit is needed.
Frequently Asked Questions About Electronic Scale Not Accurate
Why does my scale give different readings each time I weigh the same thing?
Inconsistent readings usually indicate calibration drift, an unstable surface, or debris interfering with the load cell. Start by cleaning the scale, checking the surface, and recalibrating with certified weights. If the problem persists, the load cell may be damaged.
Can a low battery make my scale inaccurate?
Yes. Weak batteries cause flickering displays, unstable readings, and failure to zero properly. Always replace batteries with fresh alkaline or lithium cells, even if the scale powers on. Clean the contacts while you’re at it.
Does putting a scale on carpet affect accuracy?
Yes significantly. Bathroom scales on carpet can read 5 to 10% higher than on hard flooring due to surface compression and uneven support. Always place your scale on tile, concrete, or solid hardwood for accurate readings.
How often should I calibrate my electronic scale?
For daily use, calibrate weekly. For occasional use, calibrate monthly or after any movement. For high-precision applications like jewelry or lab work, calibrate before each use. Always use certified NIST-traceable weights for best results.
What’s the simplest way to test if my scale is accurate?
Use the U.S. nickel test. Five nickels equal exactly 25.00g. Place them on the center of the platform. If your scale reads 25.0g (with 0.1g tolerance), it’s accurate. If not, recalibrate or investigate further.
When should I replace my inaccurate scale instead of repairing it?
Replace if the scale fails calibration repeatedly despite proper troubleshooting, shows visible physical damage like a cracked display, has corroded internal components from moisture, or when repair costs exceed half the price of a new unit.
Key Takeaways for Fixing an Electronic Scale Not Accurate
An electronic scale not accurate is usually fixable with simple steps. Start with the big three: calibration, surface, and battery. Clean the scale monthly to prevent debris from binding moving parts. Test accuracy periodically with known weights like five U.S. nickels. Address environmental factors like drafts, temperature swings, and vibrations that can disrupt sensitive electronics. For critical uses, invest in a high-quality scale with auto-calibration and environmental resistance features. With proper care and regular maintenance, your scale can deliver reliable results for years, saving you money on replacements and frustration from inaccurate measurements.



