
Imagine you’re in a doctor’s office, stepping onto a sturdy metal platform with two sliding weights on a horizontal bar. There’s no digital display, no beep. Just silence and a small pointer waiting to move. This is a mechanical beam scale, a trusted tool still widely used in clinics, hospitals, and homes for its reliability and precision. Knowing how to read a mechanical beam scale correctly is essential for accurate weight measurement, especially in medical settings where even a quarter-pound difference can affect patient care.
Unlike digital scales, mechanical beam scales require hands-on operation. You must manually adjust counterweights, observe a balance indicator, and add two readings together. While this process may seem outdated, it ensures high accuracy without relying on batteries or electronics. In this guide, you’ll learn step by step how to zero, balance, and interpret the scale’s readings with confidence, avoiding common errors like parallax misreading or improper calibration.
Prepare the Scale Properly
Level and Stabilize the Platform
A mechanical beam scale must sit on a hard, flat, level surface. Uneven flooring tilts the balance mechanism, leading to inaccurate readings. Never use it on carpet or a sloped floor. If the scale rocks, adjust its leveling feet or relocate it. Stability directly impacts measurement integrity.
Zero Before Every Use
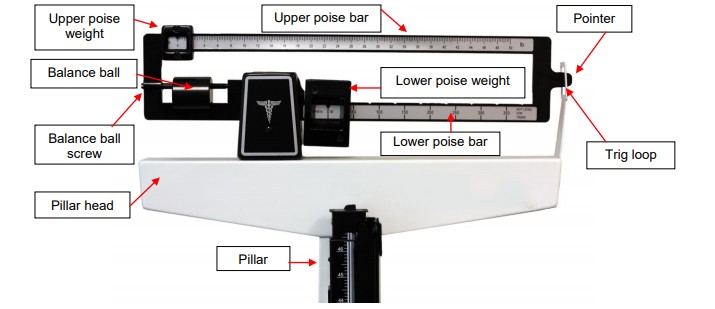
Always begin with a zeroed scale. Slide both the large (lower) and small (upper) poise weights to the 0 mark. Check the indicator arm. It should float freely in the center of the balance window. If the arm leans up or down, the scale is out of calibration and needs servicing. Do not proceed if unbalanced.
Estimate Patient Weight First
Why Estimation Matters
Before the patient steps on, make a quick visual estimate of their weight. This helps you set the coarse weight close to the correct value, reducing adjustment time and minimizing stress on the mechanism. For example, if the person appears to weigh around 180 lb, slide the large weight to 150 lb or 200 lb as a starting point.
Positioning for Accuracy
Ask the patient to remove shoes and heavy outerwear. Have them stand barefoot, centered on the platform. They should keep arms at their sides and remain still. Ask them to avoid shifting weight or holding objects during measurement. Movement throws off equilibrium and delays accurate balancing.
Adjust the Large Weight
Use the Lower Poise Bar
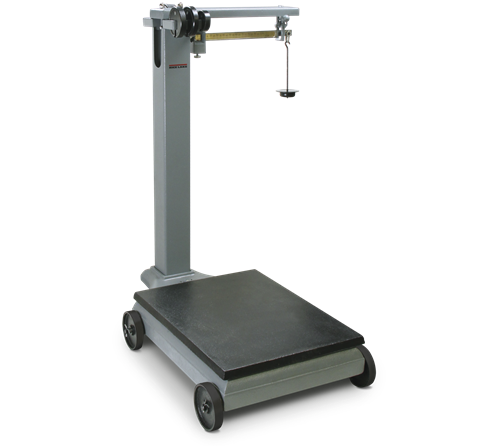
The large weight on the lower poise bar moves in 50 lb or 100 lb increments, depending on the model. After your initial estimate, slide this weight to the nearest major division. For instance, estimated 212 lb means setting large weight to 200 lb. Estimated 98 lb means setting to 100 lb, then fine-tuning down. Have the patient step on only after setting this coarse weight.
Observe the Indicator Arm
Once the person is on the scale, watch the vertical indicator arm. If it rises to the top of the balance window, the counterweight is too light. If it drops to the bottom, the counterweight is too heavy. Adjust the large weight up or down in 50 lb steps until the arm moves into the middle range.
Fine-Tune with the Small Weight
Slide the Upper Poise Gradually
With the large weight set, switch to the small weight on the upper poise bar. This allows 1 lb and fractional adjustments. Move it slowly from left to right while watching the indicator arm. Your goal is to center the arm exactly between the top and bottom of the balance window.
Achieve Perfect Balance
Stop adjusting when the indicator arm floats motionless in the center. This means the total poise weight equals the person’s body weight. Any tilt indicates imbalance. Continue fine-tuning until centered. Move the small weight gently because jerky motions cause overshooting and delay precision.
Read the Lower Poise Bar
Identify Coarse Weight Markings
The lower bar displays weight in 50 lb or 100 lb intervals, labeled clearly (e.g., 0, 50, 100, 150). Each long line represents a full pound. Intermediate lines help estimate values between major divisions. For example, between 100 and 150 lb, the 23 lb mark would read as 123 lb when combined with the base. Always read the large weight first because it forms the foundation of your total.
Avoid Parallax Error
Position your eyes directly level with the poise weight. Viewing from above or below creates parallax error, making the weight appear off by several pounds. Bend your knees if needed to align your line of sight perfectly with the graduation marks.
Read the Upper Poise Bar
Understand Fractional Increments
The upper bar is finely graduated. Whole numbers appear every 1 lb. The first short line after a whole number equals 1/4 lb. The second (often longer) line equals 1/2 lb. The third short line equals 3/4 lb. So if the small weight rests just past 31, on the first tick it reads 31 1/4 lb, on the middle line it reads 31 1/2 lb, and on the third tick it reads 31 3/4 lb. These fractions matter especially in pediatric or critical care dosing.
Confirm Visual Alignment
Ensure the edge of the sliding weight aligns precisely with the graduation line. Some models have a center notch. Others use the leading edge. Consult your scale’s manual if unsure. When in doubt, recheck the balance before recording your measurement.
Calculate Total Weight
Add Large and Small Readings
Total weight is simple arithmetic. The large weight plus the small weight equals the total. Examples include 150 lb plus 15.5 lb equaling 165.5 lb, 200 lb plus 12 lb equaling 212 lb, and 100 lb plus 44.75 lb equaling 144.75 lb. Always include fractions in documentation. Never round unless protocol specifies.
Record Accurately
In clinical settings, record weight to the nearest quarter-pound (e.g., 187.25 lb, not “about 187”). Consistent precision supports reliable trend tracking over time. Accurate documentation matters for medication dosing, nutritional planning, and patient monitoring.
Calibrate Daily for Reliability
Perform Zero Balance Check
Before each use, clear the platform. Return both weights to zero. Verify the indicator arm centers in the balance window. If it doesn’t center, recheck surface level and ensure no debris under the platform. Contact a technician if imbalance persists. An uncalibrated scale cannot provide trustworthy data.
Schedule Professional Servicing
Even well-maintained scales drift over time. Annual or biannual calibration by a certified technician ensures long-term accuracy. This is especially vital in hospitals and clinics where weight measurements directly impact patient care decisions.
Maintain the Scale Long-Term
Clean Without Damage
Wipe the platform with a dry or slightly damp cloth. Avoid sprays, liquids, or abrasive cleaners. Moisture can seep into mechanical parts, causing rust or friction. Keep the mechanism dry at all times.
Protect the Mechanism
Never drop or bump the scale. Avoid stacking items on the beam. Store in a dry, temperature-stable area. Keep sliding tracks free of dust and lint. Mechanical scales last decades but only with proper care.
Troubleshoot Common Issues
Indicator Arm Off-Center at Zero
This indicates internal misalignment or worn springs. Stop using the scale and request professional recalibration. Do not attempt to repair internal mechanisms yourself.
Arm Won’t Center Despite Adjustment
Possible causes include damaged linkage, debris under platform, or bent beam. Inspect visibly and clean gently. Discontinue use if unresolved. Schedule professional service for repairs.
Inconsistent Readings
Causes include uneven floor, patient movement, or loose bolts and worn parts. Re-level the scale. Instruct patient to stand still. Tighten fasteners or schedule repair as needed.
Prevent User Errors
Train All Operators
Not everyone knows how to read a mechanical beam scale correctly. Train staff on proper zeroing, eye-level reading, fraction interpretation, and balance confirmation. Standardize technique across users to ensure consistency.
Avoid Rushed Measurements
Take time to balance fully. Skipping fine-tuning for speed sacrifices accuracy. In medicine, precision matters more than speed. A few extra seconds ensures clinical reliability.
Compare to Digital Scales

Mechanical vs Digital: Key Differences
Mechanical beam scales require no power source while digital scales need batteries or AC adapters. Reading speed is slower on mechanical models because manual balancing takes time. Accuracy remains high on mechanical scales when calibrated properly, while digital accuracy varies by model. Maintenance stays low on mechanical scales with no electronics to fail. Digital scales require sensor wear checks and battery replacement. Skill level needed is moderate to high for mechanical but low for digital. Longevity spans decades for mechanical versus 5-10 years typical for digital. Clinical trust remains excellent for mechanical and good for digital when calibrated.
Follow Best Practices
Ensure Measurement Consistency
Zero the scale before each use. Use hard, level flooring only. Have the patient stand still and centered. Read both bars at eye level. Record fractional weights precisely. Measure at the same time daily for tracking. Train all users uniformly. These habits ensure repeatable, clinically valid results.
Recognize Clinical Importance
Why Accuracy Matters
Even 0.25 lb (1/4 lb) can impact pediatric medication dosing, IV fluid calculations, nutritional planning, and heart failure or renal patient monitoring. A misread fraction could mean under- or overdosing. This represents a serious clinical risk that must be avoided.
Support Treatment Decisions
Precise weight tracking detects subtle changes. Two pounds gain in 24 hours may indicate possible fluid retention. Gradual loss over weeks may signal nutritional concern. Only accurate scales reveal these trends, enabling timely intervention.
Frequently Asked Questions About Reading a Mechanical Beam Scale
What is the first step when using a mechanical beam scale?
Always zero the scale first. Slide both the large and small weights to the zero mark. Verify the indicator arm floats freely in the center of the balance window. If it doesn’t center, the scale needs calibration before use.
How do you read the fractional markings on the upper poise bar?
The upper bar shows 1 lb increments with three smaller divisions between each whole number. The first short line equals 1/4 lb, the second medium line equals 1/2 lb, and the third short line equals 3/4 lb. Read directly at eye level to avoid parallax error.
Why does the indicator arm move during weighing?
The indicator arm shows balance status. When it rises to the top of the balance window, the counterweight is too light. When it drops to the bottom, the counterweight is too heavy. Center positioning indicates proper balance between the person’s weight and the poise weights.
Can mechanical beam scales be used on carpet?
No. Mechanical beam scales require a hard, flat, level surface for accurate readings. Carpet creates uneven surfaces that tilt the balance mechanism. This leads to significant measurement errors. Always place the scale on tile, hardwood, or concrete.
How often should a mechanical beam scale be professionally calibrated?
Professional calibration should occur annually or biannually. Clinical environments with high usage may benefit from more frequent checks. Regular calibration ensures long-term accuracy, especially vital in medical settings where weight affects treatment decisions.
Key Takeaways for Reading a Mechanical Beam Scale
Reading a mechanical beam scale is a skill that combines observation, precision, and practice. The process involves manually adjusting two sliding weights: a large weight for coarse 50 lb or 100 lb increments and a small weight for fine 1 lb and fractional adjustments. The indicator arm must float exactly centered in the balance window for an accurate reading. Total weight equals the large weight plus the small weight.
Accuracy is critical in medical contexts because even small errors affect treatment decisions. Pediatric medication dosing, IV fluid calculations, and nutritional monitoring all depend on precise weight measurements. Daily zero calibration, proper leveling, and eye-level reading prevent common errors. With proper training and attention to detail, anyone can achieve expert-level results on these reliable, time-tested instruments.



