
If you’ve ever brewed beer, made wine, or crafted mead, you’ve likely encountered a hydrometer—a slender glass instrument that floats in liquid to measure its density. Knowing how to read a hydrometer scale correctly is essential for tracking fermentation, calculating alcohol content, and ensuring your batch turns out as expected. A single misread can throw off your entire calculation, leading to flat ciders, weak wines, or overcarbonated bottles.
The process seems simple: float the hydrometer, take a reading, and move on. But small errors—like reading the top of the meniscus instead of the bottom or skipping temperature correction—can lead to inaccurate results. This guide walks you through every step of reading a hydrometer scale with precision, from understanding the markings to avoiding common mistakes.
Identify Your Hydrometer Scales

Most hydrometers used in brewing and winemaking feature three scales etched on the stem. Each provides different but related information about your liquid.
Specific Gravity (SG): The Primary Scale
This is the main scale for fermentation monitoring. It measures liquid density relative to water, where pure water at the calibration temperature reads 1.000.
The scale typically ranges from 0.990 to 1.160, with major marks every 0.010 units. Smaller lines between them represent 0.002 increments. For accuracy, estimate values to three or four decimal places.
Key points to remember:
- Above 1.000: Liquid contains dissolved sugars (pre-fermentation)
- Below 1.000: Alcohol has replaced sugars, reducing density (post-fermentation)
- Never assume “1.2” means 1.200—most standard hydrometers only go up to 1.160
Brix, Plato, and Balling: Sugar Content Scales
These scales estimate sugar concentration by weight and are commonly used in winemaking and commercial brewing.
- 1°Brix equals approximately 1 gram of sugar per 100 grams of liquid
- 1°Plato equals roughly 0.004 increase in specific gravity (10°P equals approximately 1.040 SG)
While numerically similar, Brix and Plato diverge slightly at higher concentrations. Balling is an older version, rarely used today.
Potential Alcohol Scale: Estimate Final Strength
Located on many dual-scale hydrometers, this scale predicts maximum alcohol by volume if all sugars ferment completely.
This scale varies by manufacturer and doesn’t account for yeast performance or residual sweetness. Use it as a rough guide only—always calculate actual ABV using original and final gravity readings.
Prepare Equipment and Sample
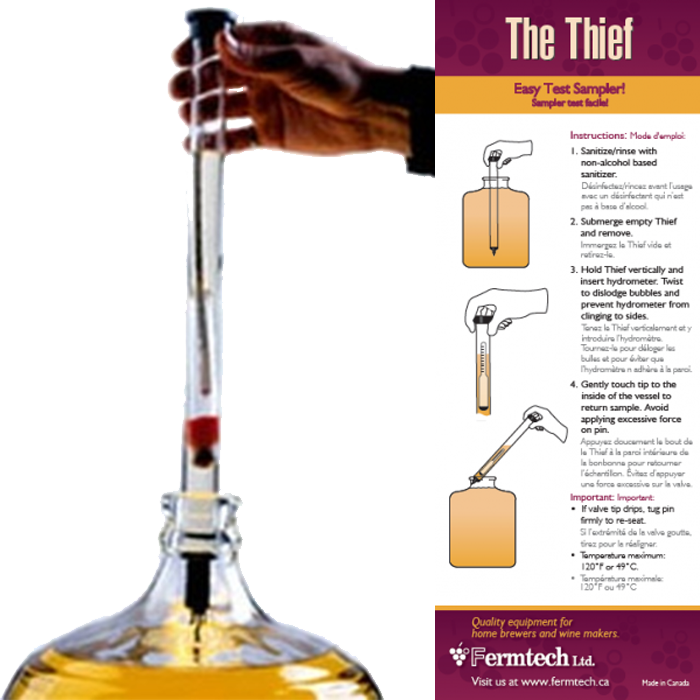
Accurate readings start with proper preparation. Even a clean hydrometer can give false results if the sample is contaminated or improperly collected.
Sanitize All Tools
Contamination ruins batches. Before sampling, sanitize the hydrometer, test jar, and sampling tool using a no-rinse sanitizer like Star San or VWP.
Collect a Clean Liquid Sample
Avoid disturbing sediment at the bottom of your fermenter. Insert your wine thief into the mid-layer of liquid and pull a sample free of trub or lees. Suspended particles increase density and skew readings upward.
Fill the Test Jar Properly
Transfer the sample to a sanitized test jar. Fill to 300–350 mL (10–12 oz)—enough for the hydrometer to float freely without touching the bottom or sides. Too little liquid causes inaccurate buoyancy; too much risks spillage.
Float and Stabilize the Hydrometer
Once the sample is ready, it’s time to take the reading. Technique matters significantly here.
Insert Hydrometer Gently
Lower the hydrometer into the liquid stem-first. Don’t drop it or force it down—let it float naturally. Forcing it releases bubbles and risks breakage.
Spin to Remove Air Bubbles
Gently spin the hydrometer between your fingers to dislodge any bubbles clinging to the glass. Bubbles increase buoyancy and inflate the reading. Wait for the hydrometer to stop spinning and settle vertically.
Ensure Level Surface
Place the test jar on a flat, stable surface. A tilted jar causes the hydrometer to lean, leading to parallax error. Use a countertop or table—avoid holding the jar in hand.
Read the Bottom of the Meniscus
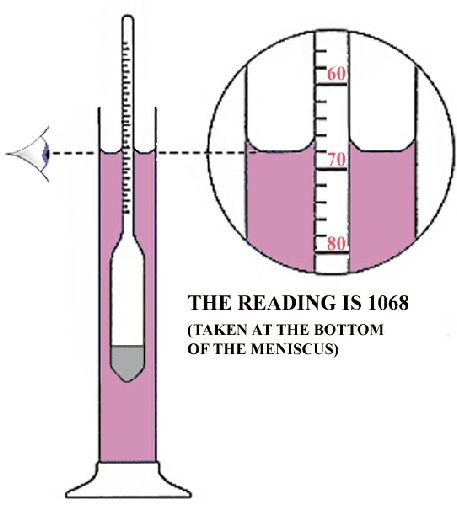
This is the most critical step in reading a hydrometer scale accurately.
What Is the Meniscus?
The meniscus is the curved surface of liquid where it meets the glass stem due to surface tension. It forms a U-shape around the hydrometer, with the edge rising slightly along the glass.
Always Read at the Bottom
Read where the liquid surface intersects the scale at the bottom of the meniscus, not the top. Reading at the raised edge produces an inflated value. Reading at the lowest point of the curve gives the true density.
Position Your Eyes Level
Hold your head so your eyes are level with the meniscus. Looking down creates a false high reading. Looking up creates a false low reading. Imagine a straight horizontal line cutting across the bottom of the curve—where it crosses the scale is your reading.
Estimate Between Scale Lines
Most hydrometers mark every 0.002 units between major divisions. You’ll often need to interpolate for precision.
Example: Reading between 1.054 and 1.056
- One small line equals 0.002 difference
- Halfway between equals 1.055
- One-quarter of the way up equals 1.0545
Estimate proportionally based on how close your reading is to the nearest marked line. Closer to 1.054? Record 1.0542. Just past midpoint? Record 1.0555.
Correct for Temperature

Hydrometers are calibrated to a specific temperature—commonly 60°F (15.6°C) or 68°F (20°C). If your sample is warmer or cooler, the reading will be off.
Check Calibration Temperature
Look for a label on the hydrometer stem. Calibrated at 60°F means readings are accurate only at that temperature. Using it at 80°F without correction introduces significant error.
Effects of Temperature
- Hotter than calibration: Liquid expands, less dense, hydrometer sinks, reading too low
- Colder than calibration: Liquid contracts, denser, hydrometer floats higher, reading too high
Two Correction Methods
Option 1 involves adjusting sample temperature. Cool or warm your sample to match the hydrometer’s calibration point using an ice bath or warm water bath. Wait 5–10 minutes for equilibrium.
Option 2 involves applying temperature correction when adjusting isn’t practical.
| Sample Temp (°F) | Correction (60°F hydrometer) |
|---|---|
| 50°F | -0.002 |
| 55°F | -0.001 |
| 60°F | 0 |
| 70°F | +0.001 |
| 80°F | +0.002 |
| 85°F | +0.003 |
Example: Reading 1.050 at 80°F, add 0.002, corrected SG equals 1.052.
Record Original and Final Gravity
Two key measurements define fermentation success: Original Gravity (OG) and Final Gravity (FG).
Take OG Before Fermentation
Measure OG immediately after cooling wort or mixing must, but before adding yeast. This indicates total fermentable sugars and is required for ABV calculation.
Typical OG ranges:
- Light beer or cider: 1.030–1.040
- Ale: 1.045–1.055
- Mead or strong ale: 1.070–1.100+
Never skip OG—without it, you cannot calculate ABV.
Measure FG After Fermentation
Take FG when airlock bubbling stops and gravity readings stabilize over 2–3 days. This confirms fermentation completion and detects stuck or incomplete fermentations.
Typical FG ranges:
- Dry beer: 1.008–1.012
- Sweet wine or mead: 1.015–1.030+
- High-alcohol base: Can drop below 0.990
Calculate Alcohol by Volume (ABV)
With OG and FG, calculating ABV is simple using established formulas.
Standard Homebrewing Formula
ABV equals (OG minus FG) times 131.25.
Example:
- OG equals 1.060
- FG equals 1.012
- ABV equals (1.060 minus 1.012) times 131.25 equals 6.3%
Alternative Calculations
- Quick estimate: (OG minus FG) times 130
- High-sugar applications like meads: (OG minus FG) times 135
For very high or low gravities, use the advanced Ballings formula: ABV equals [(76.08 times (OG minus FG)) divided by (1.775 minus OG)] times (FG divided by 0.794).
Troubleshoot Common Reading Errors
Even experienced brewers make mistakes. Here’s how to spot and fix them.
Inconsistent Readings
Causes include temperature swings, bubbles on the hydrometer, or sediment in the sample. Standardize sample temperature, spin hydrometer to remove bubbles, and sample from the clear layer.
Hydrometer Sticks to Jar Wall
Cause: Static charge or insufficient liquid. Use a wider test jar and ensure full submersion.
Reading Seems Too High or Low
Likely cause: Misreading the meniscus. Recheck at the bottom of the curve with eyes level.
Hydrometer Sinks to Bottom
Cause: Not enough liquid in test jar. Add more sample until the hydrometer floats freely.
Final Gravity Drifts Over Time
This could mean incomplete fermentation, infection (check for off-odors), or yeast autolysis. Wait 24–72 hours and retest. Stable readings confirm completion.
Maintain and Calibrate Your Hydrometer
A well-maintained hydrometer lasts years. Poor care leads to inaccurate readings and breakage.
Clean After Every Use
Rinse with clean water. Soak in warm water for sticky residues like honey or fruit pulp. Avoid scrubbing—scratches obscure scale markings.
Store Safely
Keep in its protective plastic tube. Store upright in a dry, cool place. Avoid extreme temperatures that could crack glass.
Check Calibration Regularly
Test every 6–12 months. Fill test jar with distilled water at calibration temperature. Insert hydrometer—it should read exactly 1.000.
If it reads 1.002, subtract 0.002 from all future readings. If it reads 0.998, add 0.002. Replace if cracked, cloudy, or consistently inaccurate.
Follow Best Practices for Reliable Results
Avoiding mistakes starts with consistent habits.
- Sanitize all equipment before use
- Take OG before pitching yeast
- Sample from mid-layer, avoid sediment
- Read at bottom of meniscus, eye level
- Correct for temperature
- Wait for stable FG over multiple days
- Record all data including date, time, temperature, OG, and FG
- Use same hydrometer per batch
- Store safely in protective case
Do not return sample to fermenter. Avoid daily sampling—it increases oxidation risk.
Apply Readings to Real Brewing Decisions
A hydrometer isn’t just for math—it’s a fermentation health monitor.
- Steady gravity drop indicates healthy fermentation
- Sudden plateau suggests stuck fermentation—check temperature, nutrients, and yeast health
- Back-sweetening should only occur after confirmed stable FG and yeast inhibition with potassium sorbate
- Wait until FG is stable before bottling to prevent bottle bombs from continued CO2 production
In mead-making, initial gravities often exceed 1.100. Use a high-gravity hydrometer or pair with a refractometer and apply alcohol correction.
Frequently Asked Questions About Reading a Hydrometer Scale
What does a hydrometer actually measure?
A hydrometer measures the specific gravity or density of a liquid relative to pure water. In brewing, this tells you how much sugar is dissolved in your wort, must, or wine—information critical for tracking fermentation and calculating alcohol content.
Why does my hydrometer reading look wrong?
The most common causes include reading the top of the meniscus instead of the bottom, taking readings at the wrong temperature, or having sediment in your sample. Always read at the bottom of the meniscus with eyes level, correct for temperature deviations, and sample from the clear mid-layer of your fermenter.
Can I use my hydrometer for both beer and wine?
Yes, the same hydrometer works for all fermented beverages. The specific gravity scale is universal. Just ensure you’re using appropriate ranges—wine and mead often require high-gravity hydrometers that read beyond the standard 1.070 range.
How often should I take gravity readings during fermentation?
Check gravity every 3–7 days during active fermentation. Daily sampling increases oxidation risk and provides minimal useful information since gravity changes gradually. Take an OG reading before pitching yeast and FG readings every few days once bubbling slows.
What if my hydrometer doesn’t float straight?
This usually indicates insufficient liquid in the test jar, damage to the hydrometer, or contamination on the glass. Use more sample, clean the hydrometer thoroughly, or replace it if the bulb appears damaged or the stem is bent.
Key Takeaways for Reading a Hydrometer Scale
Reading a hydrometer scale accurately is a foundational skill in fermentation that transforms guesswork into precise data. The most critical technique is reading at the bottom of the meniscus with your eyes level—this single step eliminates the most common source of error. Always correct for temperature differences between your sample and the hydrometer’s calibration point, and record readings to three or four decimal places for accurate ABV calculations.
By mastering meniscus reading, temperature correction, proper sampling, and consistent recording, you ensure every batch meets your expectations. Practice these techniques on your next brew, and you’ll gain real-time insight into fermentation progress and final alcohol content. With practice, this quick test becomes one of the most powerful tools in your brewing arsenal.



