
Imagine measuring flour with the precision of a professional baker, not with a scoop and a guess, but with a digital readout that tells you exactly 125 grams. Now imagine that scale wasn’t bought online but built by you. Making a kitchen scale from scratch is more than a DIY project; it’s a gateway to understanding how sensors, electronics, and code come together to solve everyday problems. Using just a load cell, HX711 amplifier, Arduino, and an LCD display, you can create a reliable, gram-accurate scale for under $50. This guide walks you through every step, from wiring the circuit to calibrating the sensor, so you can build a functional kitchen scale that rivals commercial models.
Choose the Right Load Cell for Your Kitchen Scale
The load cell is the heart of your scale. It converts mechanical force into an electrical signal using internal strain gauges that flex slightly under weight, altering their resistance. For typical kitchen use, a 1 kg load cell offers the best balance between sensitivity and capacity. It detects small weights like spices and flour while remaining within safe limits for most ingredients. A 5 kg or higher model will sacrifice the fine resolution needed for baking precision.
Look for a load cell with a marked arrow indicating force direction. This arrow should point downward during mounting to ensure proper compression. The electrical output produces millivolt-level signals proportional to applied weight, too weak for direct microcontroller reading without amplification.
Pair the Load Cell with HX711 Amplifier
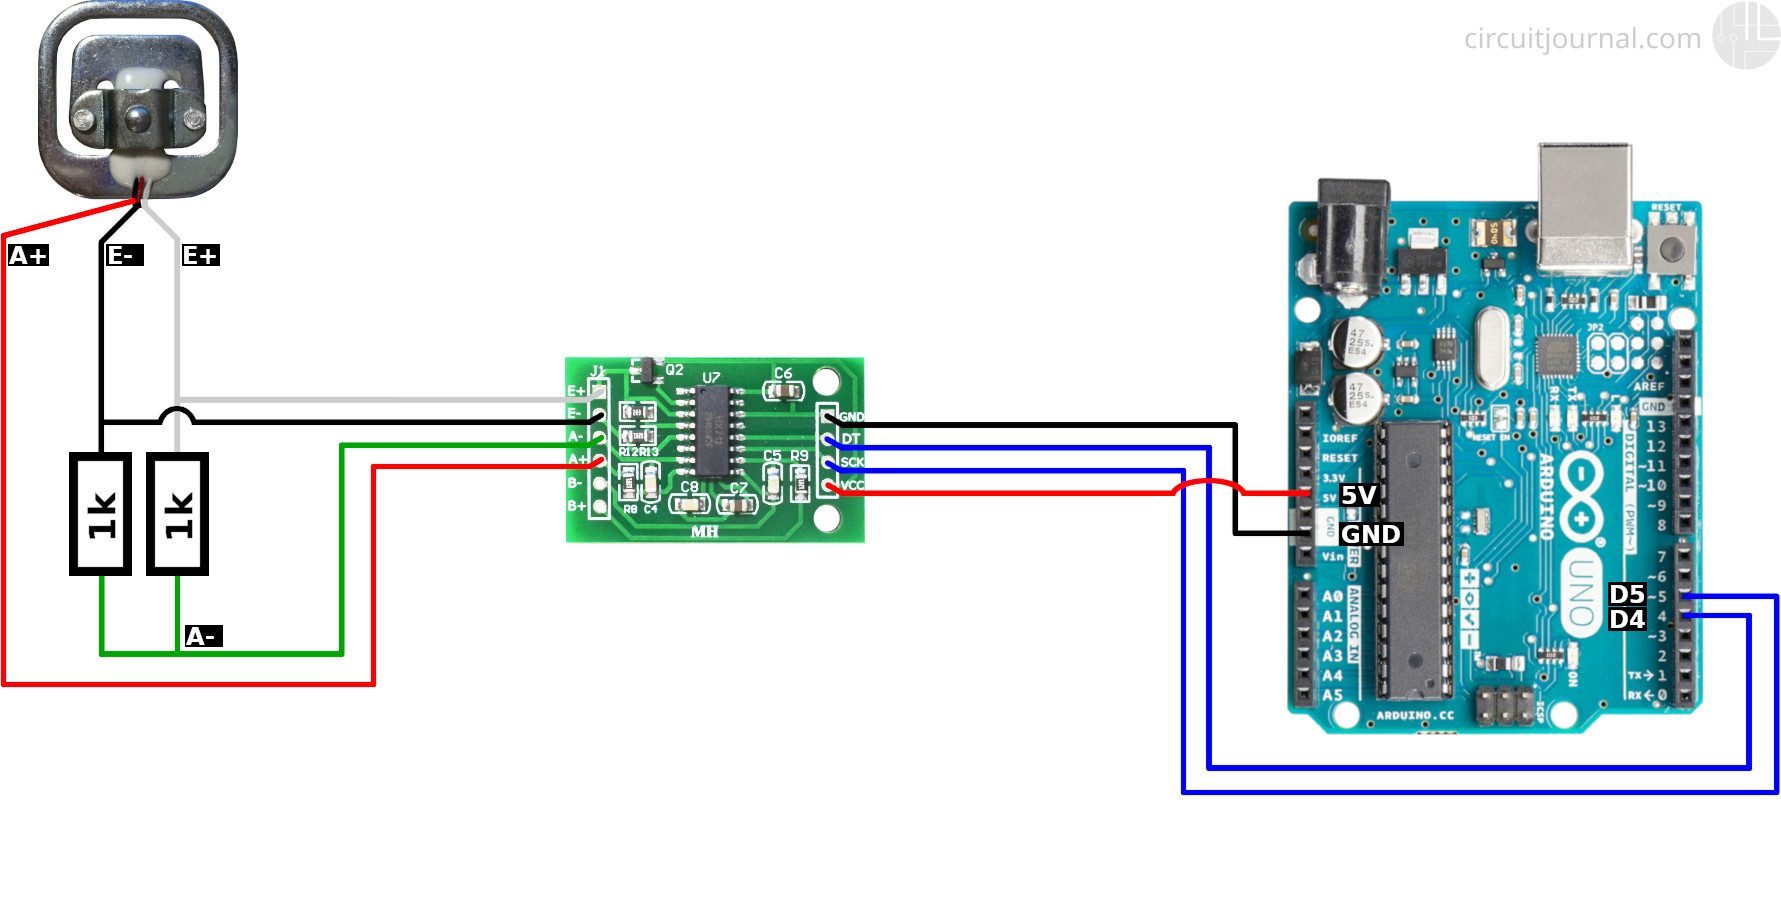
The HX711 amplifier module is essential for accurate readings. It amplifies the load cell’s tiny millivolt signal and converts it to digital data the Arduino can process. With 24-bit resolution, it detects changes as small as 0.1 g, making it ideal for kitchen precision.
The module handles noise filtering and signal stabilization automatically, delivering consistent readings even on uneven countertops. Connect it directly to the Arduino using just two pins for data transfer, and power it from the 5V rail. The built-in averaging and filtering improve stability in fluctuating environments.
Select Arduino and LCD Display Components
An Arduino Uno or Nano serves as the central processing unit, reading digital data from the HX711, applying calibration factors, and calculating actual weight. Both boards are widely supported and easy to program.
For output, use a 16×2 character LCD that clearly shows weight readings like “Weight: 230 g.” Install a potentiometer on the back to adjust contrast for optimal visibility. If space allows, choose a backlit version for better readability in dim kitchens. The display connects to six digital pins and shows real-time measurements during operation.
Wire the Circuit Connections Correctly

Stable connections between components prevent erratic readings and ensure long-term reliability. Follow the wiring tables precisely for each interface.
Connect Load Cell to HX711 Module
Match the four load cell wires to the HX711 terminals according to this configuration:
Red wire goes to E+ (Excitation Voltage +)
Black wire goes to E− (Excitation Voltage −)
White wire goes to A− (Amplifier Input −)
Green wire goes to A+ (Amplifier Input +)
Wire colors vary by manufacturer. If unsure, use a multimeter to test continuity or refer to the datasheet. Reversing A+ and A− will cause negative readings.
Link HX711 to Arduino Board
Connect the HX711 module to digital pins on the Arduino using this configuration:
VCC connects to 5V
GND connects to GND
SCK connects to Digital Pin 0
DT connects to Digital Pin 1
You can use other digital pins, but update the code accordingly. Solder connections instead of relying on breadboard wires for durability, and use heat shrink tubing to insulate joints and prevent shorts.
Power the System
Run the scale on a 9V battery or AA pack for portability. Add an on/off toggle switch between the battery and Arduino’s VIN to save power when idle. During programming, connect via USB using an FTDI adapter or Arduino Uno as a bridge. Once flashed, disconnect the computer and the system runs standalone.
Install Required Arduino Libraries
Code transforms raw sensor data into meaningful weight values. You need two key libraries installed through the Arduino IDE.
Download and install the HX711 library, which interfaces with the amplifier to read raw weight data. Also install the LiquidCrystal library, which controls the 16×2 LCD display for output. Add them via Sketch > Include Library > Manage Libraries, search by name, and install the most recent version from a trusted author.
Upload and Calibrate the Code
The calibration process ensures accurate weight readings by adjusting for variations in load cell sensitivity and mechanical mounting.
Upload Calibration Sketch
Use a specialized calibration program through Arduino IDE. Initialize without any load on the scale and observe the raw HX711 output value displayed in the serial monitor.
Adjust Calibration Factor
Press A to increase the calibration factor by 100, or press D to decrease by 100. Fine-tune using increments of 10, then 1, until the displayed weight matches your known reference weight. Apply a known mass like 750 g for testing accuracy. Iterate until readings show 749 to 750 g consistently, then record your final calibration factor for use in the production sketch.
Build the Physical Enclosure
Create a sturdy frame to protect components and ensure accurate measurements.
Design and Fabricate the Base
Use CAD software like Fusion 360 to design the enclosure, then 3D print using durable plastics like PLA or ABS. Alternatively, use rigid acrylic sheet to support the load cell and distribute force evenly. Integrate slots for secure component placement and use M3 heat-press threaded inserts for strong, reusable screw attachments.
Mount the Load Cell
Glue or mechanically fasten the load cell to the support frame. Ensure the arrow on the load cell points downward, aligning with the direction of applied force. The top platform should remain level and avoid lateral movement to prevent shear forces that cause inaccurate readings.
Integrate the Display
Secure the LCD screen within the frame using standoffs or adhesive. Position it for clear viewing and adjust brightness via the rear potentiometer. Route all wiring through designated channels to keep the interior organized.
Test and Verify Accuracy
After building and programming, verify your scale’s accuracy using known reference weights.
Perform Water Test
Water serves as an excellent verification tool due to its density of 1 g/ml. Pour 100 ml of water and expect a reading of approximately 100 g. This method confirms your calibration factor is correct.
Use Coin Test
Coins with standardized weights provide convenient references. For example, a U.S. nickel weighs exactly 5.000 g. Compare your scale’s reading against known masses to confirm accuracy within ±1 g.
Frequently Asked Questions About Making a Kitchen Scale
What components do I need to build a kitchen scale?
You need four core components: a 1 kg load cell for weight sensing, an HX711 amplifier module for signal processing, an Arduino Uno or Nano as the microcontroller, and a 16×2 LCD display for showing measurements. Additional items include a battery pack, toggle switch, wiring, and an enclosure.
How accurate is a DIY kitchen scale?
With proper calibration, a DIY kitchen scale can achieve accuracy within ±1 g, matching or exceeding budget commercial models. The 24-bit HX711 amplifier detects changes as small as 0.1 g, providing sufficient resolution for baking precision.
How much does it cost to build a kitchen scale?
Component costs total approximately under $50 when sourcing new parts. Costs drop significantly if you already own an Arduino, display, or other modules. This is more expensive than basic commercial scales but offers customization and educational value.
Do I need programming experience to make a kitchen scale?
Basic programming knowledge helps, but the Arduino IDE and available libraries simplify the process. The calibration sketch provides interactive buttons for adjusting values without writing code. The entire project serves as an excellent learning opportunity for beginners.
Can I add features like tare and unit conversion?
Yes. The code supports tare functionality to zero out container weight, and you can extend it for unit conversion between grams, ounces, pounds, and milliliters. Implement these features via button presses or a rotary encoder for full customization.
Key Takeaways for Building Your Own Kitchen Scale

Building a kitchen scale combines electronics, programming, and practical construction into one rewarding project. The 1 kg load cell paired with the HX711 amplifier delivers professional-grade precision at a fraction of commercial prices. Focus on proper wiring, accurate calibration with known weights, and a stable mechanical enclosure to achieve ±1 g accuracy. Start with the core components, follow the wiring tables precisely, and calibrate using a 750 g reference weight before relying on your scale for baking.



