
Connecting a weighing scale to your computer transforms manual weighing into an automated, paperless process that eliminates human error and speeds up workflows. Whether you’re managing inventory, tracking patient weights, or running a laboratory, transferring weight data directly from scale to PC enables real-time monitoring, digital record-keeping, and seamless integration with spreadsheets and databases. This guide covers every connection type, required hardware, software options, configuration steps, and troubleshooting tips to help you set up a reliable scale-to-computer link in under 30 minutes.
Identify Your Scale’s Connection Type
The first step is determining what interface your scale supports. Most digital scales use one of three connection methods, and each requires different setup steps.
USB Connection
Many modern scales feature built-in USB ports for direct computer connection. Some USB scales act as keyboard emulators, automatically typing weight values into any text field. Others create a virtual COM port, behaving like serial devices over USB. No extra adapters are needed for direct USB scales. Check your scale manual to confirm it supports data output via USB before proceeding.
RS-232 Serial Connection
Industrial and older digital scales often use RS-232 (COM port) for data output. This method requires an RS-232 cable to link the scale to your computer. Since most modern PCs lack native serial ports, you’ll need a USB-to-RS-232 adapter. The adapter creates a virtual COM port in Windows, allowing serial communication over USB. Driver installation is required for the adapter to work properly.
Bluetooth Wireless Link
Select digital scales support wireless transmission via Bluetooth SPP (Serial Port Profile). This enables cable-free operation, ideal for clinical or cleanroom environments. You must pair the scale with your computer like any Bluetooth device. Once paired, it appears as a virtual COM port. Desktop computers may require a Bluetooth dongle since most lack built-in Bluetooth capability.
Gather Required Hardware
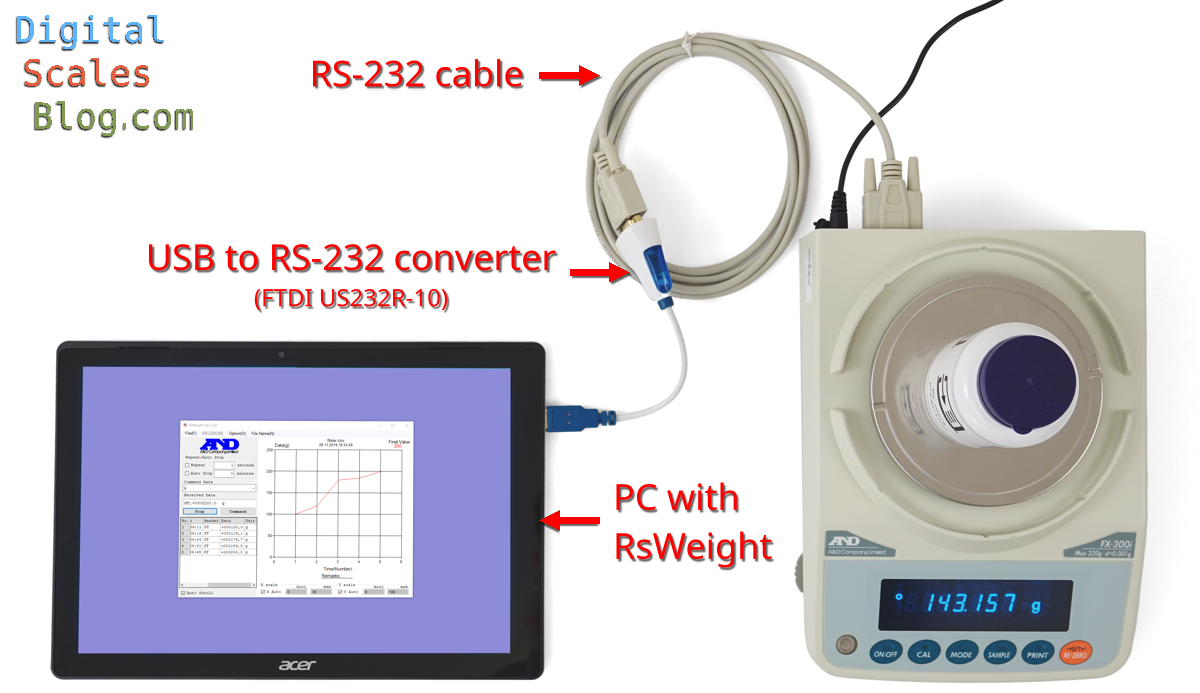
Before connecting, assemble the correct components based on your scale interface and computer setup.
Required components include:
- Scale with data output capability (must support USB, RS-232, or Bluetooth SPP)
- USB cable for direct connection or powering adapters
- RS-232 cable (often proprietary, verify pinout with manufacturer)
- USB-to-RS-232 adapter for modern PCs without serial ports
- Bluetooth dongle if using wireless connection on a desktop
- Computer running Windows for best software compatibility
Pro tip: Brands like A&D, Mettler-Tolede, Ohaus, and Sartorius often require specific cables such as the A&D AX-PC09-SCA. Always check your manual before purchasing additional hardware.
Install Drivers and Find Your COM Port
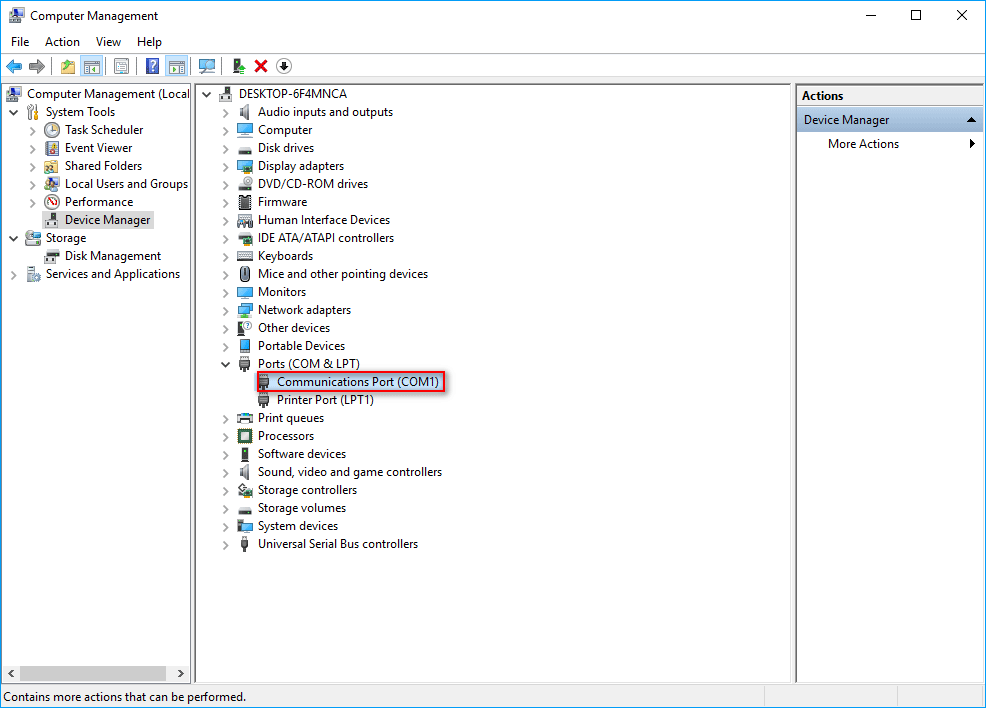
If using RS-232 or a USB-to-serial adapter, driver installation is mandatory for your system to recognize the device.
Follow these steps to install adapter drivers:
- Plug the USB-to-RS-232 adapter into an available USB port
- Windows may attempt auto-installation, but generic drivers often fail
- Download the correct driver based on your adapter’s chipset
- For FTDI chips, visit ftdichip.com
- For Prolific chips, visit prolific.com.tw
- Restart your computer after installation completes
To find your assigned COM port:
- Press Windows + X and select Device Manager
- Expand the Ports (COM & LPT) section
- Look for entries like USB Serial Port (COM3) or Prolific USB-to-Serial Comm Port (COM4)
- Note the COM number for use in software configuration
Success indicator: If the port disappears when you unplug the adapter, the driver is working correctly.
Configure Serial Communication Settings

Mismatched serial settings cause most connection failures. You must match your scale’s output settings exactly in your software.
| Setting | Common Value | Notes |
|---|---|---|
| Baud Rate | 1200 or 9600 | Check scale manual; A&D often uses 1200 |
| Data Bits | 8 | Standard setting |
| Stop Bits | 1 | Most common |
| Parity | None | Rarely used |
| Flow Control | None | Unless specified by manufacturer |
Troubleshooting tip: If you experience no communication, try common baud rates in sequence: 1200, 2400, 4800, and 9600.
Test the Connection With Terminal Software

Always verify the raw data stream before using advanced software tools. Terminal programs show real-time weight output and confirm your hardware connection works.
Using Tera Term (free):
- Download Tera Term from osdn.net
- Open the program and select File > Serial port
- Choose your COM port from the dropdown
- Enter the correct baud rate and serial parameters
- Click OK to connect
- Place weight on the scale or press PRINT/UNIT
- Watch for data such as “165.0 kg” or “ST,GS,+165.000kg”
Success indicator: If numbers appear in the terminal window, your hardware connection is working properly.
Set Up 232key for Automatic Data Entry
Want weight values to type themselves directly into Excel, Google Sheets, or web forms? 232key is a lightweight tool that converts serial data into simulated keystrokes.
Why use 232key:
- Works with RS-232, USB virtual COM, and Bluetooth SPP scales
- Sends weight directly to any keyboard-input field
- Eliminates manual copying and pasting
- Free version available with essential features
Setup steps:
- Download 232key from telemetry.dk
- Launch the program
- Click Auto-detect to find your scale’s COM port
- Or manually select the correct port
- Set baud rate and other serial parameters
- Click Start to begin
Now when you press PRINT on your scale, the weight automatically types into your active window.
Customization options:
- Add prefix or suffix such as “Weight: 165.0 kg”
- Choose to press Enter, Tab, or Ctrl+Enter after input
- Useful for moving between spreadsheet cells or submitting forms
Use Manufacturer Software for Full Integration
For advanced features like reporting, printing, and data logging, use the scale manufacturer’s proprietary software.
Care International software setup:
- Install from provided USB or download from manufacturer website
- Launch and log in to the application
- Navigate to Settings > Profile Setup
- Choose Simple or Corporate profile mode
- Enter required fields including Product Code, Customer Name, Vehicle Number, Container Number
- Save your profile
Available features:
- Real-time weight display with live updates
- Tare and Zero functions accessible in software
- Print slip generation with vehicle number, product code, date/time, net/gross weights
- Report generation including Customer, Project, Income, and Product reports
This software is ideal for truck scales, inventory systems, and billing operations.
Calibrate Your Scale Before First Use
An uncalibrated scale delivers inaccurate data regardless of how perfect your computer connection is.
General calibration steps:
- Place scale on a level, stable surface
- Ensure no load is on the platform
- Press and hold Clear + On/Off until display shows “44000”
- Enter calibration password (check your manual)
- Press On/Off until “Ready” appears
- Follow on-screen prompts to complete calibration
Best practice: Recalibrate monthly or after moving the scale to maintain accuracy.
Troubleshoot Common Connection Problems
Even with correct setup, issues can occur. Use this checklist to resolve problems quickly.
No data appearing in software:
- Wrong COM port selected: Rescan in software or check Device Manager
- Incorrect baud rate: Try 1200, 2400, 4800, 9600 sequentially
- Missing driver: Reinstall FTDI or Prolific driver
- Loose cable: Reseat all connections firmly
- Non-ASCII output: Confirm scale sends readable text
232key not typing:
- Weight must be the first numeric value in the data string
- Scale must send data on trigger (button press), not continuously
- Disable Wait for delimiter if data lacks CR/LF ending
Bluetooth pairing failures:
- Confirm scale supports Serial Port Profile (SPP)
- Delete old pairings and retry pairing process
- Use Windows built-in Bluetooth setup in Settings > Devices
Garbled text in terminal:
- Mismatched baud rate or parity settings
- Try all setting combinations until clean data appears
- Replace low-quality USB-to-serial adapters
Automate Data Logging and Reporting
Once connected, maximize your setup with automation for long-term monitoring and analysis.
Log data to file:
- Use Tera Term logging or custom scripts
- Export to CSV for analysis in Excel or Python
- Ideal for batch weighing, quality control, and unattended monitoring
Integrate with business systems:
- Excel: Use 232key to auto-fill spreadsheets
- Google Forms: Submit weights to cloud databases
- LIMS: Connect precision balances via RS-232
- ERP/Inventory Software: Feed weight data into SAP, Oracle, or custom tools
Pro workflow example: Scale → 232key → Google Sheet → Dashboard via Looker Studio
Key Takeaways for Connecting Your Scale to Computer
Connecting a weighing scale to your computer is a powerful upgrade for accuracy and efficiency in any weighing application. The process begins with identifying your scale’s interface type (USB, RS-232, or Bluetooth) and gathering the appropriate cables and adapters. Driver installation is critical for USB-to-serial adapters, and you must locate the assigned COM port in Device Manager before configuring your software.
Serial communication settings must match exactly between your scale and application, with baud rate being the most common setting to verify. Test your connection using free terminal software like Tera Term before using advanced tools. For automated data entry, 232key types weight values directly into spreadsheets or web forms. Manufacturer software provides full reporting capabilities for industrial applications.
Regular calibration ensures ongoing accuracy, and troubleshooting involves checking COM port selection, baud rate matching, driver installation, and cable connections. With the right hardware, drivers, and software configuration, you can establish a reliable automated weighing system in under 30 minutes.
Frequently Asked Questions About Connecting Scales to Computer
What connection type is best for connecting a scale to a computer?
USB offers the simplest setup with no adapters required. RS-232 provides reliable industrial connections but needs USB-to-serial adapters on modern computers. Bluetooth enables wireless operation but requires SPP support. Choose based on your scale’s available interfaces and your workflow needs.
Do I need to install drivers to connect my scale?
Driver installation is required only when using USB-to-RS-232 adapters or certain USB scales that create virtual COM ports. Direct USB scales with keyboard emulation typically work without additional drivers. Always check your scale manual for specific requirements.
Why is my scale not communicating with my computer?
Common causes include wrong COM port selection, mismatched baud rate settings, loose cables, missing drivers, or non-ASCII data output. Start by verifying the COM port in Device Manager, then test different baud rates (1200, 2400, 4800, 9600) until you receive clean data.
Can I automatically transfer weight data to Excel?
Yes, using 232key software. It converts serial weight data into simulated keystrokes that type directly into Excel cells, Google Sheets, or any application accepting keyboard input. Configure the COM port and serial settings, then press PRINT on your scale to transfer data.
How do I find the correct COM port for my scale?
Connect your scale or adapter, then open Device Manager (press Windows + X > Device Manager). Expand Ports (COM & LPT) to see assigned COM ports. Unplug and replug the device to confirm which entry corresponds to your scale.



