
You step onto your bathroom scale, ready to track your progress, but the display stays blank or shows “0.0” while ignoring your weight entirely. You tap it, reset it, even replace the batteries, but nothing changes. This common issue affects thousands of users every year, yet in over 90% of cases, it’s fixable with simple troubleshooting. This guide walks you through every possible reason your digital scale isn’t responding and exactly how to fix it, step by step.
Whether it’s a kitchen, bathroom, or precision lab scale, the root cause usually lies in power supply, placement, calibration, or environmental factors. By the end of this article, you’ll know exactly what to check, what to fix, and when it’s time to replace your scale entirely.
Replace Weak or Dead Batteries

Low or failing batteries are the leading cause of digital scales not displaying weight, accounting for nearly 60% of reported issues. Even if a battery reads 1.27V on a multimeter, it may not deliver enough power under load to activate the scale’s circuitry. Fresh alkaline batteries should measure 1.5V to 1.6V. Below 1.35V, performance drops sharply, leading to blank screens or unresponsive sensors.
Check Battery Voltage Under Load
Pro Tip: Don’t rely solely on voltage tests. A battery can show adequate voltage at rest but fail when the scale demands startup current. Always replace with brand-new alkaline batteries, even if the old ones seem functional.
To test properly:
- Remove the batteries from the compartment
- Test each battery with a multimeter
- Look for voltage readings below 1.35V as a red flag
- Replace any battery showing weakness
Clean Corroded Battery Contacts
Battery leakage or moisture can corrode metal contacts in the compartment, breaking the electrical connection. Look for white or greenish crust around the terminals.
Fix it fast:
- Remove batteries from the compartment
- Dab a cotton swab in isopropyl alcohol
- Gently scrub contact points until clean
- Let dry completely before reinserting fresh batteries
- Inspect for pitting or damage that may require replacement
If contacts are pitted or damaged, consider replacing the scale. Repairing internal traces is rarely cost-effective for consumer models.
Place on a Hard, Level Surface
One in four “broken” scales are actually just placed incorrectly. Soft surfaces like carpet, vinyl, or grout lines prevent the scale’s feet from making full contact with the ground. This misaligns the load cells, so no weight is registered, even if the display turns on.
Avoid Carpets, Rugs, and Uneven Floors
Solution: Move the scale to a hard, flat surface like tile, concrete, or solid wood. Press down on each corner to ensure all feet touch the floor evenly.
Time Estimate: Less than 1 minute
Difficulty: Easy
Success Rate: High for surface-related issues
Use the Built-in Level Indicator
Many digital scales include a leveling bubble. If the bubble is off-center, adjust the feet until it’s centered. An unlevel scale can’t calibrate properly and may show zero regardless of applied weight.
Reset and Recalibrate the Scale
After battery changes or moving the scale, the zero-point calibration can be lost. The scale may display “0.0” but won’t register weight because it hasn’t re-zeroed.
Perform a Manual Reset
Reset Steps:
- Remove batteries from the compartment
- Press and hold the TARE or POWER button for 15 seconds
- Reinsert fresh batteries
- Wait 2 to 5 seconds for the display to stabilize
- Step on lightly (bathroom scale) or place a small object (kitchen scale) to wake the sensor
User Insight: Some scales require a foot tap to activate. Just standing still may not trigger the sensor.
Recalibrate Using Correct Weight
If the scale still doesn’t respond, perform a full calibration. This resets the internal load cell reference point.
Standard Calibration Process:
- Place scale on hard, level surface
- Power on and wait for “0.0” or “CAL” to appear
- Press TARE/UNIT or model-specific key combination
- When “CAL” flashes, place a certified calibration weight on the center
– Kitchen scale: 500g or 1kg weight
– Bathroom scale: 10 to 20 lb weight - Wait for confirmation (for example, “PASS”, “END”, or beep)
- Remove weight and scale should return to zero
Critical Tip: Use NIST-traceable weights for accuracy. Household items like dumbbells or water bottles can vary by plus or minus 5%, leading to failed calibration.
Diagnose Load Cell Failure
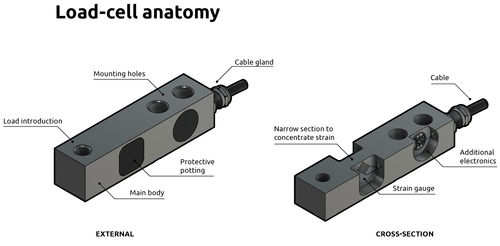
The load cell is the core component that converts pressure into electrical signals. If damaged, the scale powers on but doesn’t respond to weight.
Recognize Sensor Damage Signs
Common causes of load cell damage include:
- Overloading (even once beyond max capacity)
- Dropping or impact
- Moisture exposure
- Electrical surges
Failure Symptoms:
- Display stays at “0.0” despite applied weight
- Erratic or drifting readings
- Persistent “UNST” or “E” error codes after reset
Test with Known Weight
Place a verified weight (for example, 500g calibration mass) on the scale. If there’s no response, the load cell or signal board is likely faulty.
Diagnostic Shortcut:
- Gently press each corner of the platform
- Listen for subtle clicks or movement
- If the platform feels stiff or dead, internal binding or sensor failure is probable
Reality Check: Load cell replacement is complex and often costs more than a new scale. Consider replacement for consumer models.
Fix Blank or Flickering Display
A blank screen usually means no power delivery. Confirm that batteries are fresh and inserted correctly, terminals are clean and undamaged, and AC adapter (if used) outputs correct voltage.
Rule Out Power First
If the backlight flickers or pixels appear briefly, the display may be functional but underpowered. Always verify power supply before assuming display failure.
Identify Internal Electronics Failure
Persistent blank screens after battery replacement suggest deeper issues:
- Disconnected LCD ribbon cable
- Failed display driver IC
- Cracked PCB trace
Visual Clue: Shine a flashlight on the screen. Some LCDs display faint numbers even when the backlight fails, indicating the scale is working but the display isn’t.
Expert Note: Internal repairs require soldering skills and model-specific diagrams. These repairs are not recommended for casual users.
Decode Error Codes and Messages
Digital scales use error codes to signal specific faults. Here’s what they mean and how to respond:
| Code | Meaning | Action |
|---|---|---|
| E / Err | General system error | Reset, recalibrate, check power |
| OL / Over | Overload detected | Remove weight, avoid exceeding limit |
| UNST | Unstable reading | Re-level, eliminate vibrations |
| CAL | Calibration needed | Perform full calibration |
| LO | Low battery | Replace immediately |
Pro Tip: If “CAL” appears repeatedly without user input, the scale may be stuck in calibration mode. Perform a full reset.
Eliminate Environmental Interference
Precision scales (especially lab models) are sensitive to airflow, vibrations, and temperature changes.
Stop Drafts and Air Currents
Fans, open windows, or HVAC vents can create enough force to prevent accurate readings.
Fix:
- Close doors and windows
- Turn off nearby fans
- Use a draft shield for analytical balances
Reduce Vibration and Foot Traffic
Vibrations from walking, appliances, or machinery disrupt load cell measurements. Even subtle shaking can trigger “UNST” errors.
Solutions:
- Move scale to a low-traffic area
- Place on an anti-vibration mat
- Use dynamic weighing mode if available (freezes reading after stabilization)
Avoid Temperature and Humidity Swings
Operating outside 10°C to 30°C (50°F to 86°F) affects electronic stability. Rapid changes cause condensation inside the unit, leading to drift or short circuits.
Best Practice: Let the scale acclimate for 30 minutes after moving between hot and cold environments.
Inspect for Debris and Mechanical Binding
Dust, food crumbs, or liquid residue can wedge under the platform, preventing proper load transfer. Even a single grain of rice can cause binding.
Clean Under the Scale Platform
Cleaning Steps:
- Lift the scale carefully
- Inspect corners and underside
- Use a dry brush or compressed air to remove debris
- Wipe platform with a slightly damp cloth (never soak)
Check for Internal Jamming
If the platform feels rigid or doesn’t give when pressed, internal components may be jammed due to impact or warping.
Do Not Force It: Forcing movement can permanently damage strain gauges. If binding persists after cleaning, professional disassembly may be needed.
Respond to Water and Moisture Damage
Bathroom and kitchen scales are prone to moisture damage. Spills, humidity, or condensation can short circuits or corrode sensors.
Dry Out After Liquid Exposure
Emergency Protocol:
- Power off immediately
- Remove batteries or unplug
- Wipe exterior with dry cloth
- Place in a warm, dry area for 24 to 48 hours (for example, near a dehumidifier)
- Do not use heat sources like hair dryers or ovens, which can melt internal components
Warning: If the scale was submerged or heavily exposed, internal corrosion is likely irreversible.
Choose Water-Resistant Models
Prevent future issues by selecting scales with IP67 or IP68 ratings, indicating dust-tight and waterproof construction. These models are ideal for bathrooms, outdoor use, and industrial kitchens.
Bypass Unresponsive Keypad

If the TARE or UNIT button is unresponsive, you can’t recalibrate normally. But there’s a hardware workaround: shorting the calibration jumper pins on the motherboard.
Tools Needed:
- Precision screwdriver
- Metal tweezers or small wire
- 500g calibration weight
Step-by-Step Bypass:
- Open the back panel to expose the circuit board
- Locate two small metal pins labeled “CAL” or “JP1” (may be unmarked)
- Power on the scale while shorting the pins with tweezers
- When “1” appears, press TARE
- When “2” appears, place 500g weight on platform
- Press TARE
- Enter capacity (for example, 30000 for 30kg scale), then TARE
- Confirm and power off
Success Rate: Over 80% for scales with functional displays and load cells.
When to Repair vs. Replace
Repair Is Worth It If:
- Problem is battery, surface, or calibration-related
- Keypad or reset issue fixed via jumper
- Scale is under warranty
- Repair cost is less than 50% of new unit price
Replace If:
- Load cell is dead
- Internal corrosion or water damage is present
- Persistent “Err” or blank screen after troubleshooting
- Scale is over 5 years old
- Scale was overloaded and is unresponsive
Average Lifespan:
- Consumer scales: 3 to 5 years
- Industrial models: 5 to 10 years with maintenance
Bottom Line: For most home users, replacement is faster and cheaper than repair.
Prevent Future Scale Failures
Follow Maintenance Best Practices
| Task | Frequency | Tip |
|---|---|---|
| Replace batteries | Every 6 to 12 months | Use alkaline, not rechargeable NiMH |
| Clean platform | Weekly | Damp cloth only, no soaking |
| Verify zero function | Before each use | Press TARE, confirm “0.0” |
| Test with known weight | Monthly | Use certified test weights |
| Recalibrate | After moving or every 3 to 6 months | Follow manual exactly |
| Check leveling | Before critical use | Use built-in bubble level |
| Store properly | When not in use | Dry place, batteries removed |
Use the Right Scale for the Environment
- Bathroom: Choose IP67-rated models
- Kitchen: Prefer stainless steel with easy-clean surface
- Lab/Industrial: Use anti-vibration tables, draft shields, NIST-traceable calibration
Key Takeaways for Fixing Your Digital Scale
A digital scale not reading weight is rarely terminal. Start with battery replacement and surface correction, as they fix most issues. Then reset, recalibrate, and eliminate environmental factors. Use the jumper pin method if buttons fail. Only when hardware damage is confirmed should you consider replacement.
The two most common culprits are weak batteries and improper placement. Addressing these first saves time and money. For persistent issues, load cell failure or internal electronics damage typically means it’s time for a new scale. With proper care and maintenance, your scale can deliver accurate results for years.
Frequently Asked Questions About Digital Scale Not Reading Weight
Why does my digital scale show “0.0” but not register my weight?
This usually indicates a calibration issue or improper surface placement. The scale has zeroed itself but can’t measure weight because the load cells aren’t making proper contact. Try placing the scale on a hard, flat surface and perform a manual reset. If the problem persists, the load cell may be damaged.
Can bad batteries cause a digital scale to not read weight?
Yes. Weak or dead batteries are the number one cause of digital scales not reading weight, accounting for approximately 60% of reported cases. Even batteries that show adequate voltage at rest may fail under the startup load that digital scales require. Always replace with fresh alkaline batteries.
How do I reset my digital scale to fix weight reading issues?
Remove the batteries, then press and hold the TARE or POWER button for 15 seconds to discharge residual power. Reinsert fresh batteries and wait 2 to 5 seconds for the display to stabilize. Step on lightly or place a small object to wake the sensor. If this doesn’t work, perform a full calibration using certified weights.
What should I do if my scale displays an error code?
Consult your scale’s manual for specific code meanings. Common codes include “E” for general errors (reset and recalibrate), “OL” for overload (remove weight immediately), “UNST” for unstable readings (re-level the scale), and “LO” for low battery (replace batteries). Address the specific cause indicated by the code.
Is it worth repairing a digital scale that won’t read weight?
It depends on the cause. If the issue is batteries, surface placement, or calibration, repair is definitely worth it. If the load cell is damaged, internal electronics have failed, or the scale shows visible water damage, replacement is usually the better choice. Most consumer scales cost less to replace than to repair.
How long do digital scales typically last?
Consumer digital scales typically last 3 to 5 years with proper maintenance. Industrial models can last 5 to 10 years with regular calibration and care. Battery replacement, proper storage, and avoiding overload conditions extend lifespan significantly.



