
Building a truck scale from scratch gives you full control over size, capacity, and materials while saving significant money compared to commercial units. Farms, quarries, recycling centers, and small logistics operations benefit most from custom-built scales that handle specific vehicle weights and site conditions. This guide walks you through every step of how to build a truck scale, from selecting load cells and designing the weighbridge to pouring the foundation and calibrating the system.
By the end, you will know exactly what components you need, which design choices matter most, and how to avoid costly mistakes that compromise accuracy and durability.
Choose the Right Load Cells for Your Scale
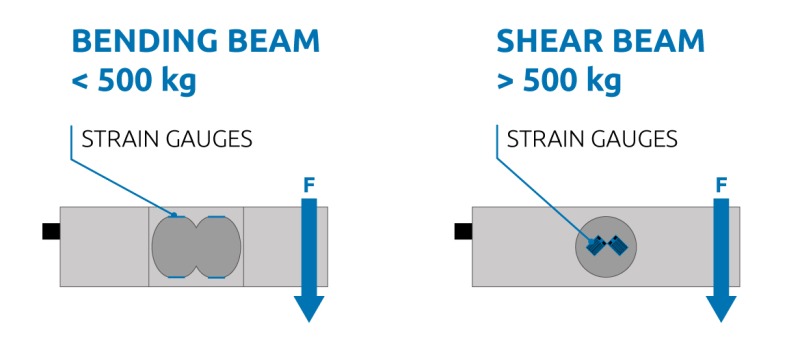
Load cells are the heart of any truck scale—they convert mechanical force into electrical signals that your indicator reads as weight. Choosing the correct type and capacity directly determines accuracy, maintenance needs, and how long your scale performs reliably.
Select Digital or Analog Models
Digital load cells offer plug-and-play installation, built-in diagnostics, and resistance to electrical interference. They daisy-chain together, reducing wiring complexity significantly. Analog models require a junction box to combine signals and are more vulnerable to moisture and electrical noise. For DIY builds, digital load cells are strongly recommended because they simplify calibration and troubleshooting.
Compare Canister vs. Shear Beam Types
Load cell type affects long-term reliability. Canister (rocker column) models are budget-friendly but rely on moving parts that can tilt or drift over time, requiring regular recalibration. Double-ended shear beam types transfer force vertically with minimal side loading, making them more stable and requiring less maintenance. For high-traffic or corrosive environments, shear beam load cells are the better choice.
Size Load Cells for Total Capacity
Never size load cells based only on vehicle gross weight. You must account for platform dead weight, maximum expected payload, and a 20 to 30 percent safety margin. For example, a 30-foot scale handling 65,000-pound trucks with a concrete deck might need four 50,000-pound load cells totaling 200,000 pounds capacity. This ensures redundancy and prevents overload during peak loads.
Install the Weighing Indicator System
The indicator is the brain of your truck scale, processing signals from load cells and displaying weight readings. Modern smart indicators simplify setup and calibration for DIY builders.
Set Up the US-WT27-R Smart Indicator
The US-WT27-R indicator connects directly to digital load cells and provides high-resolution weight display, one-touch calibration, phone-based tech support, and data logging capabilities. It is designed for field calibration, meaning even beginners can achieve accurate readings with guided setup. Its diagnostic mode helps identify faulty load cells quickly, reducing downtime.
Wire the Junction Box and Cables
All wiring must be shielded to prevent electromagnetic interference and run through conduit or armored cable. Seal all entry points to block moisture. Label each load cell wire at both ends before connecting—this simple step saves hours during future troubleshooting. Place the weatherproof junction box in a protected location near the center of the scale.
Design a Durable Weighbridge Structure
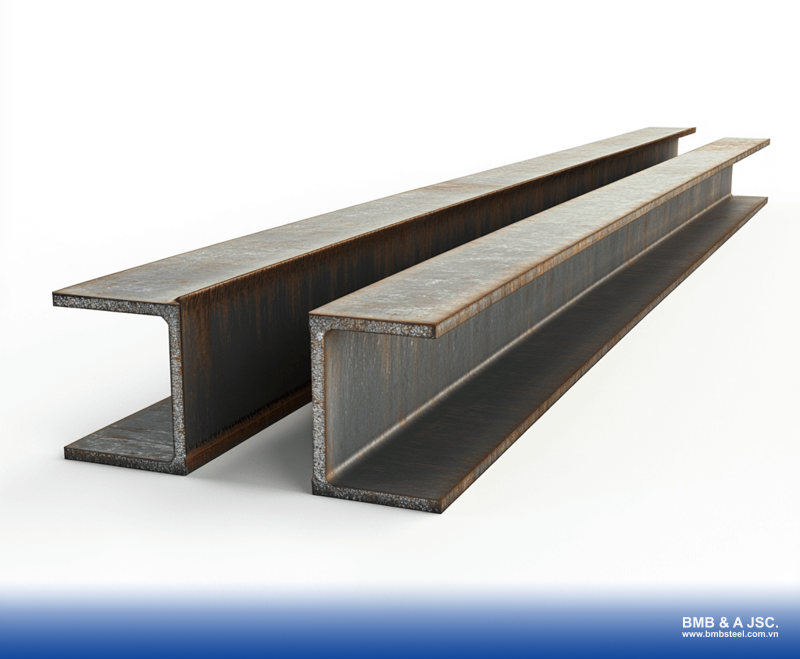
The weighbridge is the platform vehicles drive on. Its design affects weight distribution, longevity, and maintenance access.
Steel vs. Concrete Decks: Which Is Better
Steel decks are lighter, faster to install, and portable. They require simpler foundations and offer easy repair access by lifting panels. Concrete decks provide maximum durability and natural vibration dampening but require weeks of curing time and permanent, robust foundations. Choose steel if you need portability or faster installation. Choose concrete for permanent installations where maximum durability is priority.
Use U-Channel Over I-Beam Design
I-beam construction uses standard beams welded to a top plate, but the open underside traps moisture and debris, leading to rust and fatigue cracks. U-channel (orthotropic) design uses closely spaced U-shaped ribs that create a sealed deck, distribute load across multiple webs, and resist twisting and deflection. Pre-cambered profiles prevent water pooling. For DIY builds, aim for U-channel-style rigidity even if using I-beams by adding cross-bracing and sealing the underside.
Connect Modules with H-Brackets
Traditional bolted connections require precise alignment and regular torque checks. They also bind during thermal expansion. The H-bracket (drop-in) system offers fast, tool-free assembly with self-aligning pins and room for expansion and contraction. If building modular sections, design in H-bracket compatibility or use oversized washers with slotted holes to allow movement.
Build a Solid Foundation

The foundation supports everything—poorly poured pads lead to shifting, uneven loading, and premature failure.
Pour Concrete Abutments and Pads
Excavate to frost line depth, typically 36 to 48 inches. Install a rebar grid for reinforcement, then form and pour load cell mounting pads level within one-eighth inch. Cure for at least seven days, though 30 days is ideal for full strength. Use 6,000 psi concrete with fiber reinforcement for heavy-duty applications.
Install Approach Ramps Correctly
Ramps must match the scale height exactly and slope gently at one to two percent grade. A bump at entry causes shock loading that damages load cells and skews readings. Cap ramps with steel grating or textured concrete for traction. Include drainage channels on both sides to divert water away from the scale supports.
Apply Professional-Grade Fabrication Methods
Fabrication quality determines structural integrity and lifespan. Cutting corners here leads to premature failure.
Cut Steel with CNC Precision
Manual torch cutting leaves rough edges that warp during welding, causing misalignment and stress points. CNC laser cutting ensures exact dimensions, clean burr-free edges, and consistent fit-up for welding. If outsourcing fabrication, insist on CNC-cut parts.
Weld Continuously with Robotic Equipment
Spot or tack welding creates weak points where fatigue cracks start. Use continuous welds along all critical seams for uniform penetration and strength. Never skip welds on the underside of beams where moisture gets trapped and accelerates corrosion.
Apply Industrial-Grade Coatings
Paint is your defense against rust. Follow this process: blast clean to ISO 8501-1 SA 2.5 (“near-white metal”), apply epoxy primer for adhesion and corrosion resistance, finish with polyurethane or resin epoxy topcoat, and oven-cure for maximum hardness. Air-dried paint chips easily. Oven-cured multi-layer systems last decades even in salty or humid conditions.
Estimate Total Build Costs
Understanding costs helps you budget realistically and identify where you can save money through self-performance.
Break Down Material and Labor Expenses
Based on a 30-foot scale rebuild, four 50,000-pound load cells cost approximately $3,900. Steel frame materials run $2,000 or more. Concrete work (about six yards) costs $12,000 to $15,000 today. Approach ramps add $1,000 to $2,000. Total materials: approximately $20,000. Labor adds $3,000 to $4,000 if outsourced. Performing welding and concrete work yourself saves significantly.
Consider the US-TSK10D-200K Kit
This complete electronic package costs $5,295 and includes 10 digital precision load cells, the US-WT27-R indicator, junction box, and all cables. It ships free from Florida and provides everything needed for sensing and display—you simply add the platform. This kit is perfect for DIYers who already have a frame or plan to build one.
Follow Proven Design Best Practices
Avoiding common mistakes ensures your scale performs reliably for decades.
Avoid Common DIY Mistakes
Do not use undersized load cells, which leads to overload and failure. Do not skip blast cleaning, which causes coating failure. Do not create poor ramp alignment that causes shock loading. Do not use open-bottom I-beams that trap water and rust. Do not ignore thermal expansion, which causes binding and stress.
Adopt Industry-Grade Standards
Use shear beam load cells for lower maintenance. Design for drainage to keep water out. Pre-camber the deck to prevent sagging. Seal all cavities to stop internal corrosion. Allow for expansion using H-brackets or slotted holes.
Ensure Long-Term Accuracy and Reliability
Regular maintenance keeps your scale accurate and extends its service life.
Calibrate with Manufacturer Support
The US-WT27-R indicator allows phone-assisted calibration. A technician walks you through zeroing, span adjustment, and corner testing. Corner testing involves placing known weight near each corner, recording readings, and adjusting until variance is less than 0.1 percent. Recalibrate annually or after major impacts.
Perform Routine Maintenance
Monthly, inspect load cells for damage or shifting, clear debris from under the deck, test indicator function, and check cable integrity. Every two years, re-torque all mounting bolts, re-check foundation level, and re-coat damaged areas after surface prep.
Understand Legal and Compliance Requirements
DIY-built scales are for internal use only. If you are buying or selling by weight, your scale must be NTEP-certified, installed by a licensed technician, and periodically inspected. DIY scales are not legal-for-trade unless professionally validated. Use them for load monitoring, inventory tracking, farm or ranch operations, or pre-shipment checks. For commercial sales, consider hiring a certified installer or budgeting for a pre-built NTEP scale.
Key Takeaways for Building Your Truck Scale
Building a truck scale is a major project, but with the right components and methods, it pays off in durability, accuracy, and long-term savings. Start with a proven kit like the US-TSK10D-200K for reliable electronics. Design a U-channel-style deck for superior rigidity. Pour a solid foundation with proper drainage and leveling. Apply industrial coatings with correct surface preparation. Follow Keith Mudd’s lead: invest in 50,000-pound shear beam load cells, perform welding and concrete work yourself, and budget around $20,000 for a 30-foot unit. The result is a rugged, precise, and fully customized weighing system that works as hard as you do.
Frequently Asked Questions About Building a Truck Scale
How much does it cost to build a truck scale yourself?
A 30-foot DIY truck scale costs approximately $20,000 in materials, including load cells, steel frame, concrete, and ramps. Performing your own welding and concrete work saves $3,000 to $4,000 in labor costs.
What load cells do I need for a truck scale?
Use double-ended shear beam load cells for reliability and low maintenance. Size them for 20 to 30 percent over your maximum expected load including platform dead weight. Four 50,000-pound load cells work well for a 30-foot scale handling 65,000-pound vehicles.
Can I use a DIY truck scale for commercial weighing?
No. DIY-built scales are not legal-for-trade unless professionally validated and NTEP-certified. They are suitable only for internal use such as inventory tracking, load monitoring, or farm operations.
How long does it take to build a truck scale?
Steel deck builds take days to weeks. Concrete decks require several weeks due to curing time—up to 30 days for full strength. Plan for four to eight weeks total including foundation work, fabrication, and calibration.
What is the difference between steel and concrete deck scales?
Steel decks are lighter, portable, and faster to install. Concrete decks are permanent, provide natural vibration dampening, and offer maximum durability but require deeper foundations and longer curing time.



